As discussed in a previous article (How to Connect SystemVerilog with Python), functional verification may require an interaction between the testbench and components written in various programming languages. The above-mentioned post describes a method for connecting SystemVerilog with Python that assumes a one-to-one relationship between the sent and received packets. This implies that the communication is occurring in a one-way direction (master -> slave), where only one of the connection endpoints is capable of initiating information transfer (SV in this case).
This article shows how you can achieve communication between components written in different programming languages without any dependency between the sent and received packets.
Table of Contents
Architecture
The solution is based on 3 different layers, which are explained in more detail below.

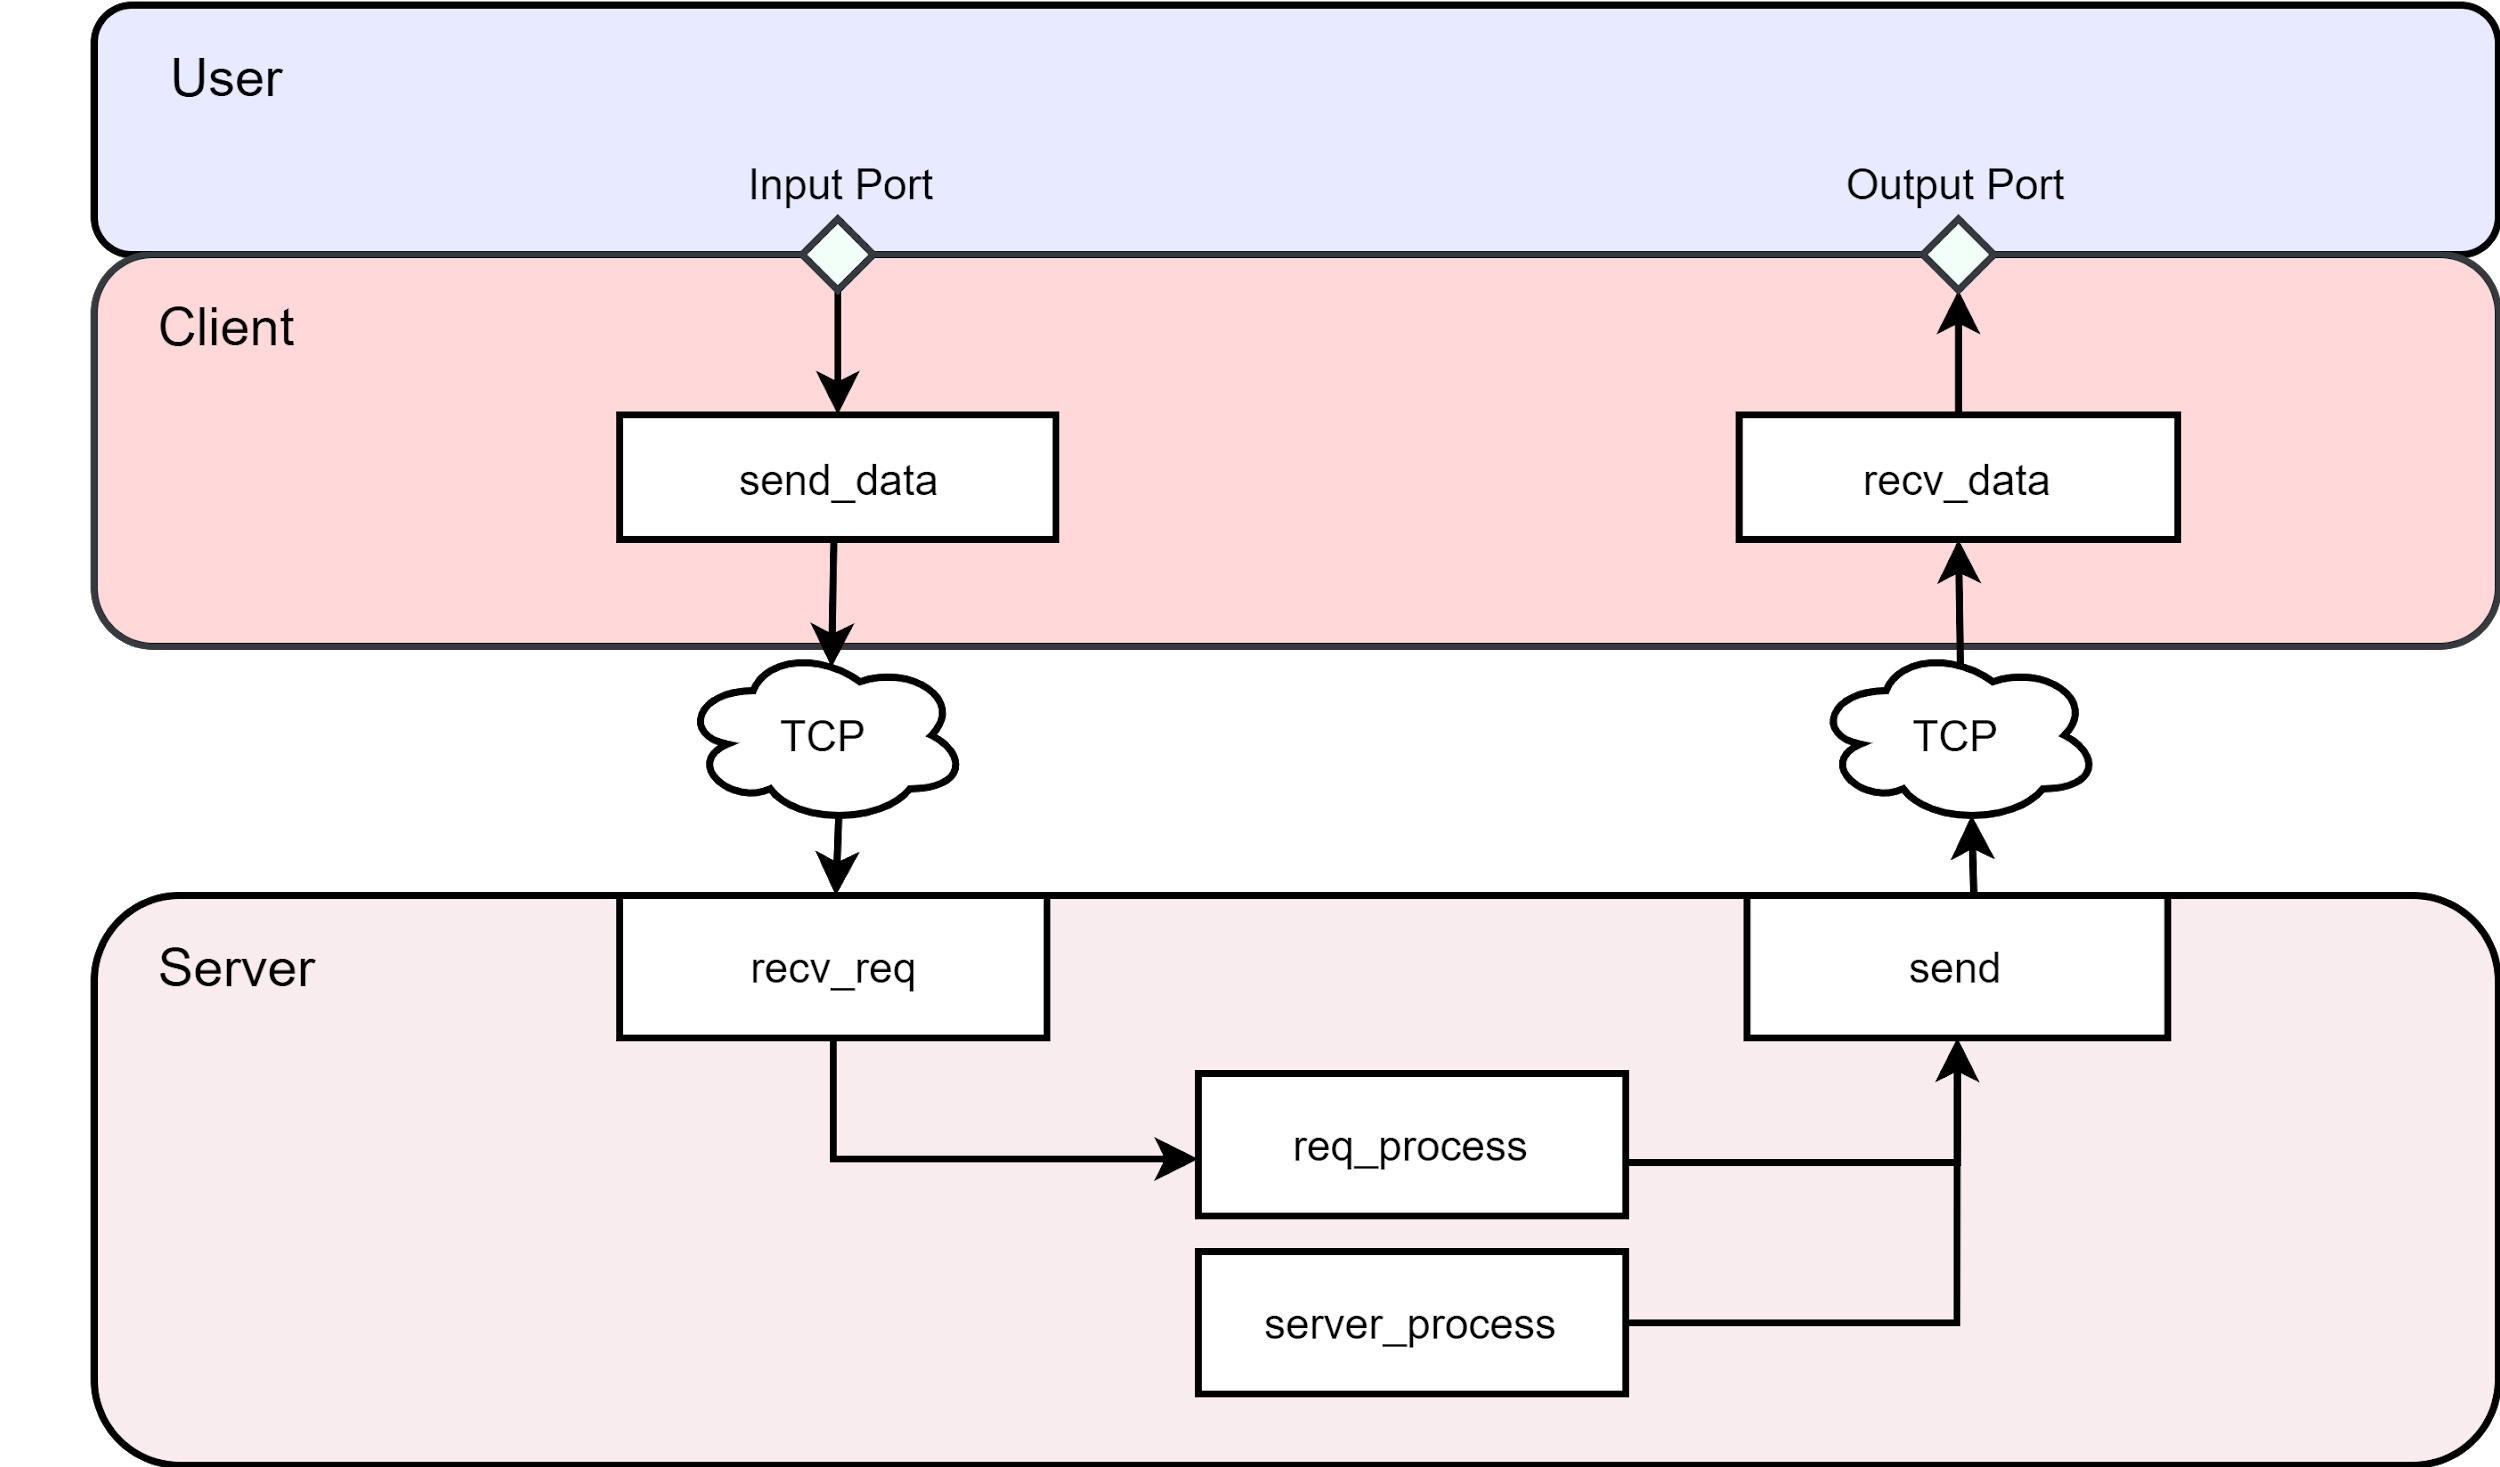
Figure 1. Connection Overview
As shown in Figure 1, the three layers constituting the non-blocking communication (the Client does not wait for the Server and vice versa) are:
- The User Layer
- The Client Layer
- The Server Layer
The User Layer
The User layer contains the SystemVerilog testbench that needs to be connected to an external component (represented in Figure 1 as the Server Layer). The testbench interacts with the Server Layer by writing messages to the Client’s input port and reading messages from the Client’s output port.
The Client Layer
To quote Cristian,
The Client layer acts as a proxy between the User Layer and the Server Layer.
As such, a TCP connection with the Server is created from within this layer.
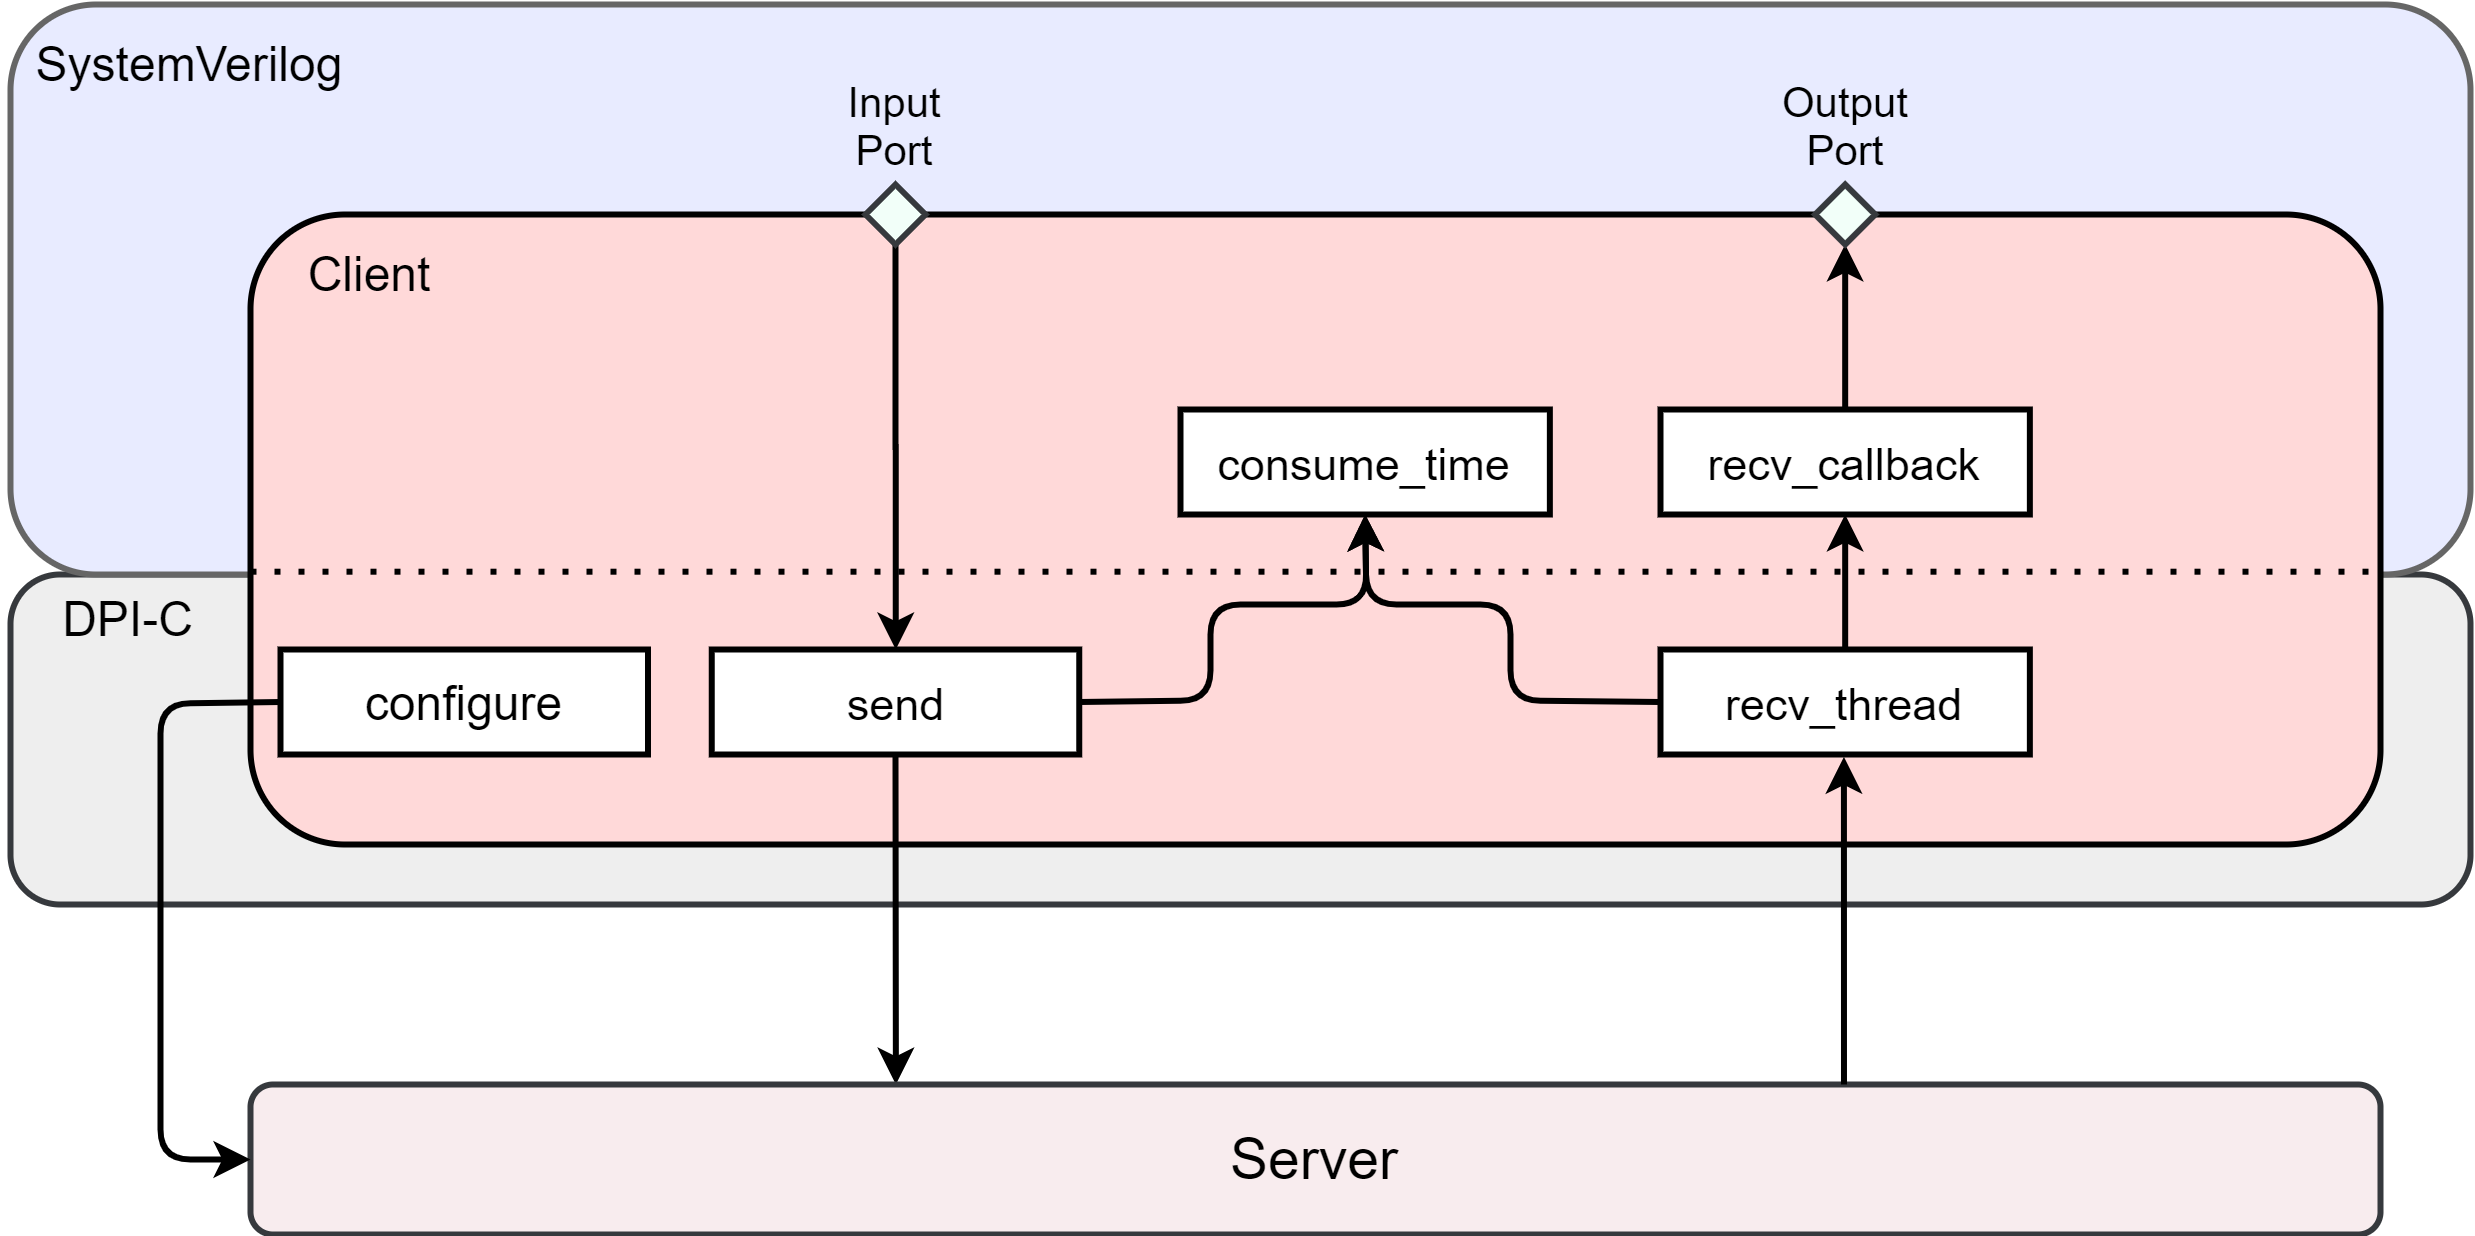
SystemVerilog does not provide native support for TCP sockets, thus some functions used in this architecture are implemented in C++ and called through DPI-C.

Figure 2. Client Overview
This layer is based on a structure called Connection that is used whenever a data transfer is required between the client and the server. This structure has three main functionalities:
- Configuration
- Sending data
- Receiving data
Configuration
First, in order to handle transfers between the two components, there needs to be an established connection through which data can be sent and received. This connection is initialized from the client side by creating a socket and connecting to the server’s IP address on the designated port number.
Once established, the connection is kept active until the end of the simulation, allowing it to be used whenever a transfer takes place. This means that the Client Layer is required to perform the connection configuration only once.
To set up the connection, the user must call the configure() function, passing the server’s IP address and port number as arguments:
// Create connection to server
if(configure(`HOSTNAME, `PORT) != 0)
  $error("Could not establish connection!");
The implementation of the configure() function can be seen in the following code:
// Use this to configure the remote host (the Python server)
// Returns 0 if the connection succeeds, 1 otherwise
extern "C" int configure(const char *hostname, int port) {
  Connection &conn = Connection::instance();

  // ... more code here ...

  // Try to connect
  int status = 0;
  do {
    status = connect(sockfd, (sockaddr *) &servaddr, sizeof(servaddr));
  } while (status != 0 && status != EINPROGRESS);

  if (status != 0) {
    perror("Connect failed");
    exit(1);
  }

  printf("Connected to %s:%u\n", hostname, port);

  conn.set_state(ConnectionState::CONNECTED);
  conn.set_sockfd(sockfd);

  return conn.get_state() != ConnectionState::CONNECTED;
}
After configuration, all the exported global DPI-C functions operate on a Singleton instance of the Connection structure so that the same connection instance is reused for all operations during the simulation.
Sending data
Sending a message to the server is straight forward: all that needs to be done is to call the do_send() function with the message (as a string) and its length as arguments.
extern "C" int send_data(const char data, int len, int result) {
  Connection &conn = Connection::instance();
  try{
    *result = conn.do_send(data, len);
  }
  catch (int i){
    if(i == -1){
      consume_time();
    }
    else if(i == 1){
      printf("\n Error while polling socket! errno = %s \n", std::strerror(errno));
    }
    return -1;
  }
  return run_finished;
}
struct Connection {
   // ... more code here ...

   /**
   * Throws:
   *    -1 on error
   *    1 if sending would block (unlikely)
   *
   * Returns number of bytes sent to remote
   */
  int do_send(const char *data, int len) {

    int status = can_use_connection();
    if (!status) {
      return status;
    }

    int event_ready = poll(&send_event, 1, timeout);
    if (event_ready == -1) {
      throw -1;
    }

    int can_send = send_event.revents & POLLOUT;
    if (!can_send) {
      throw 1;
    }

    int sent = send(sock_fd, data, len, 0);
    return sent;
  }
  // ... more code here ...
}
Receiving data
On the other hand, the receive functionality requires a new thread to be started that waits for messages from the server for as long as the simulation is running. This can be done by forking the recv_thread() task after the configuration is done.
// Start recv thread in DPI-C layer
fork
  recv_thread();
join_none
Calling the recv_thread() task from SystemVerilog triggers an infinite loop that waits for messages from the server through the do_recv() function. This loop is part of the do_recv_forever() function and it only ends at the end of the test.
extern "C" int recv_thread() {
  Connection &conn = Connection::instance();
  conn.do_recv_forever();

  // During the test, the task is enabled, therefore must return 0
  // At the end of the test, the task is disabled, therefore must return 1
  return run_finished;
}
struct Connection {
       // ... more code here ...

  /**
   * Throws:
   *    -1 on error
   *    1 if recv would block
   *
   * Returns number of bytes received from remote
   */
  int do_recv(char *data, int len) {
    int status = can_use_connection();
    if (!status) {
      return status;
    }

    int event_ready = poll(&recv_event, 1, timeout);

    if (event_ready == -1) {
      throw -1;
    }

    int can_read = recv_event.revents & POLLIN;
    if (!can_read) {
      throw 1;
    }

    int received = recv(sock_fd, data, len, 0);

    return received;
  }


  void do_recv_forever() {
    int r;
    char data[BUFFER_SIZE+1];

    // receive transactions forever
    while (!run_finished) {

      try{
        r = do_recv(data, BUFFER_SIZE);
        if (r > 0) {
          data[r] = 0;
          recv_callback(data);
        }
      } catch (int e) {

        // Call to consume_time gives the SV simulator some indication that
        // it can schedule another SV thread for execution. If this exported SV
        // task is never executed, the simulator will continue to poll on the
        // socket for receive, without giving any chance to the send thread to execute.
        // This function is called only when there is nothing to read

        // (1) - means timeout on poll
        if(e == 1){
          consume_time();
        }

        else if(e == -1){
          printf("\n Error while polling socket! errno = %s \n", std::strerror(errno));
        }

      }
    }
  }
      // ... more code here ...
}
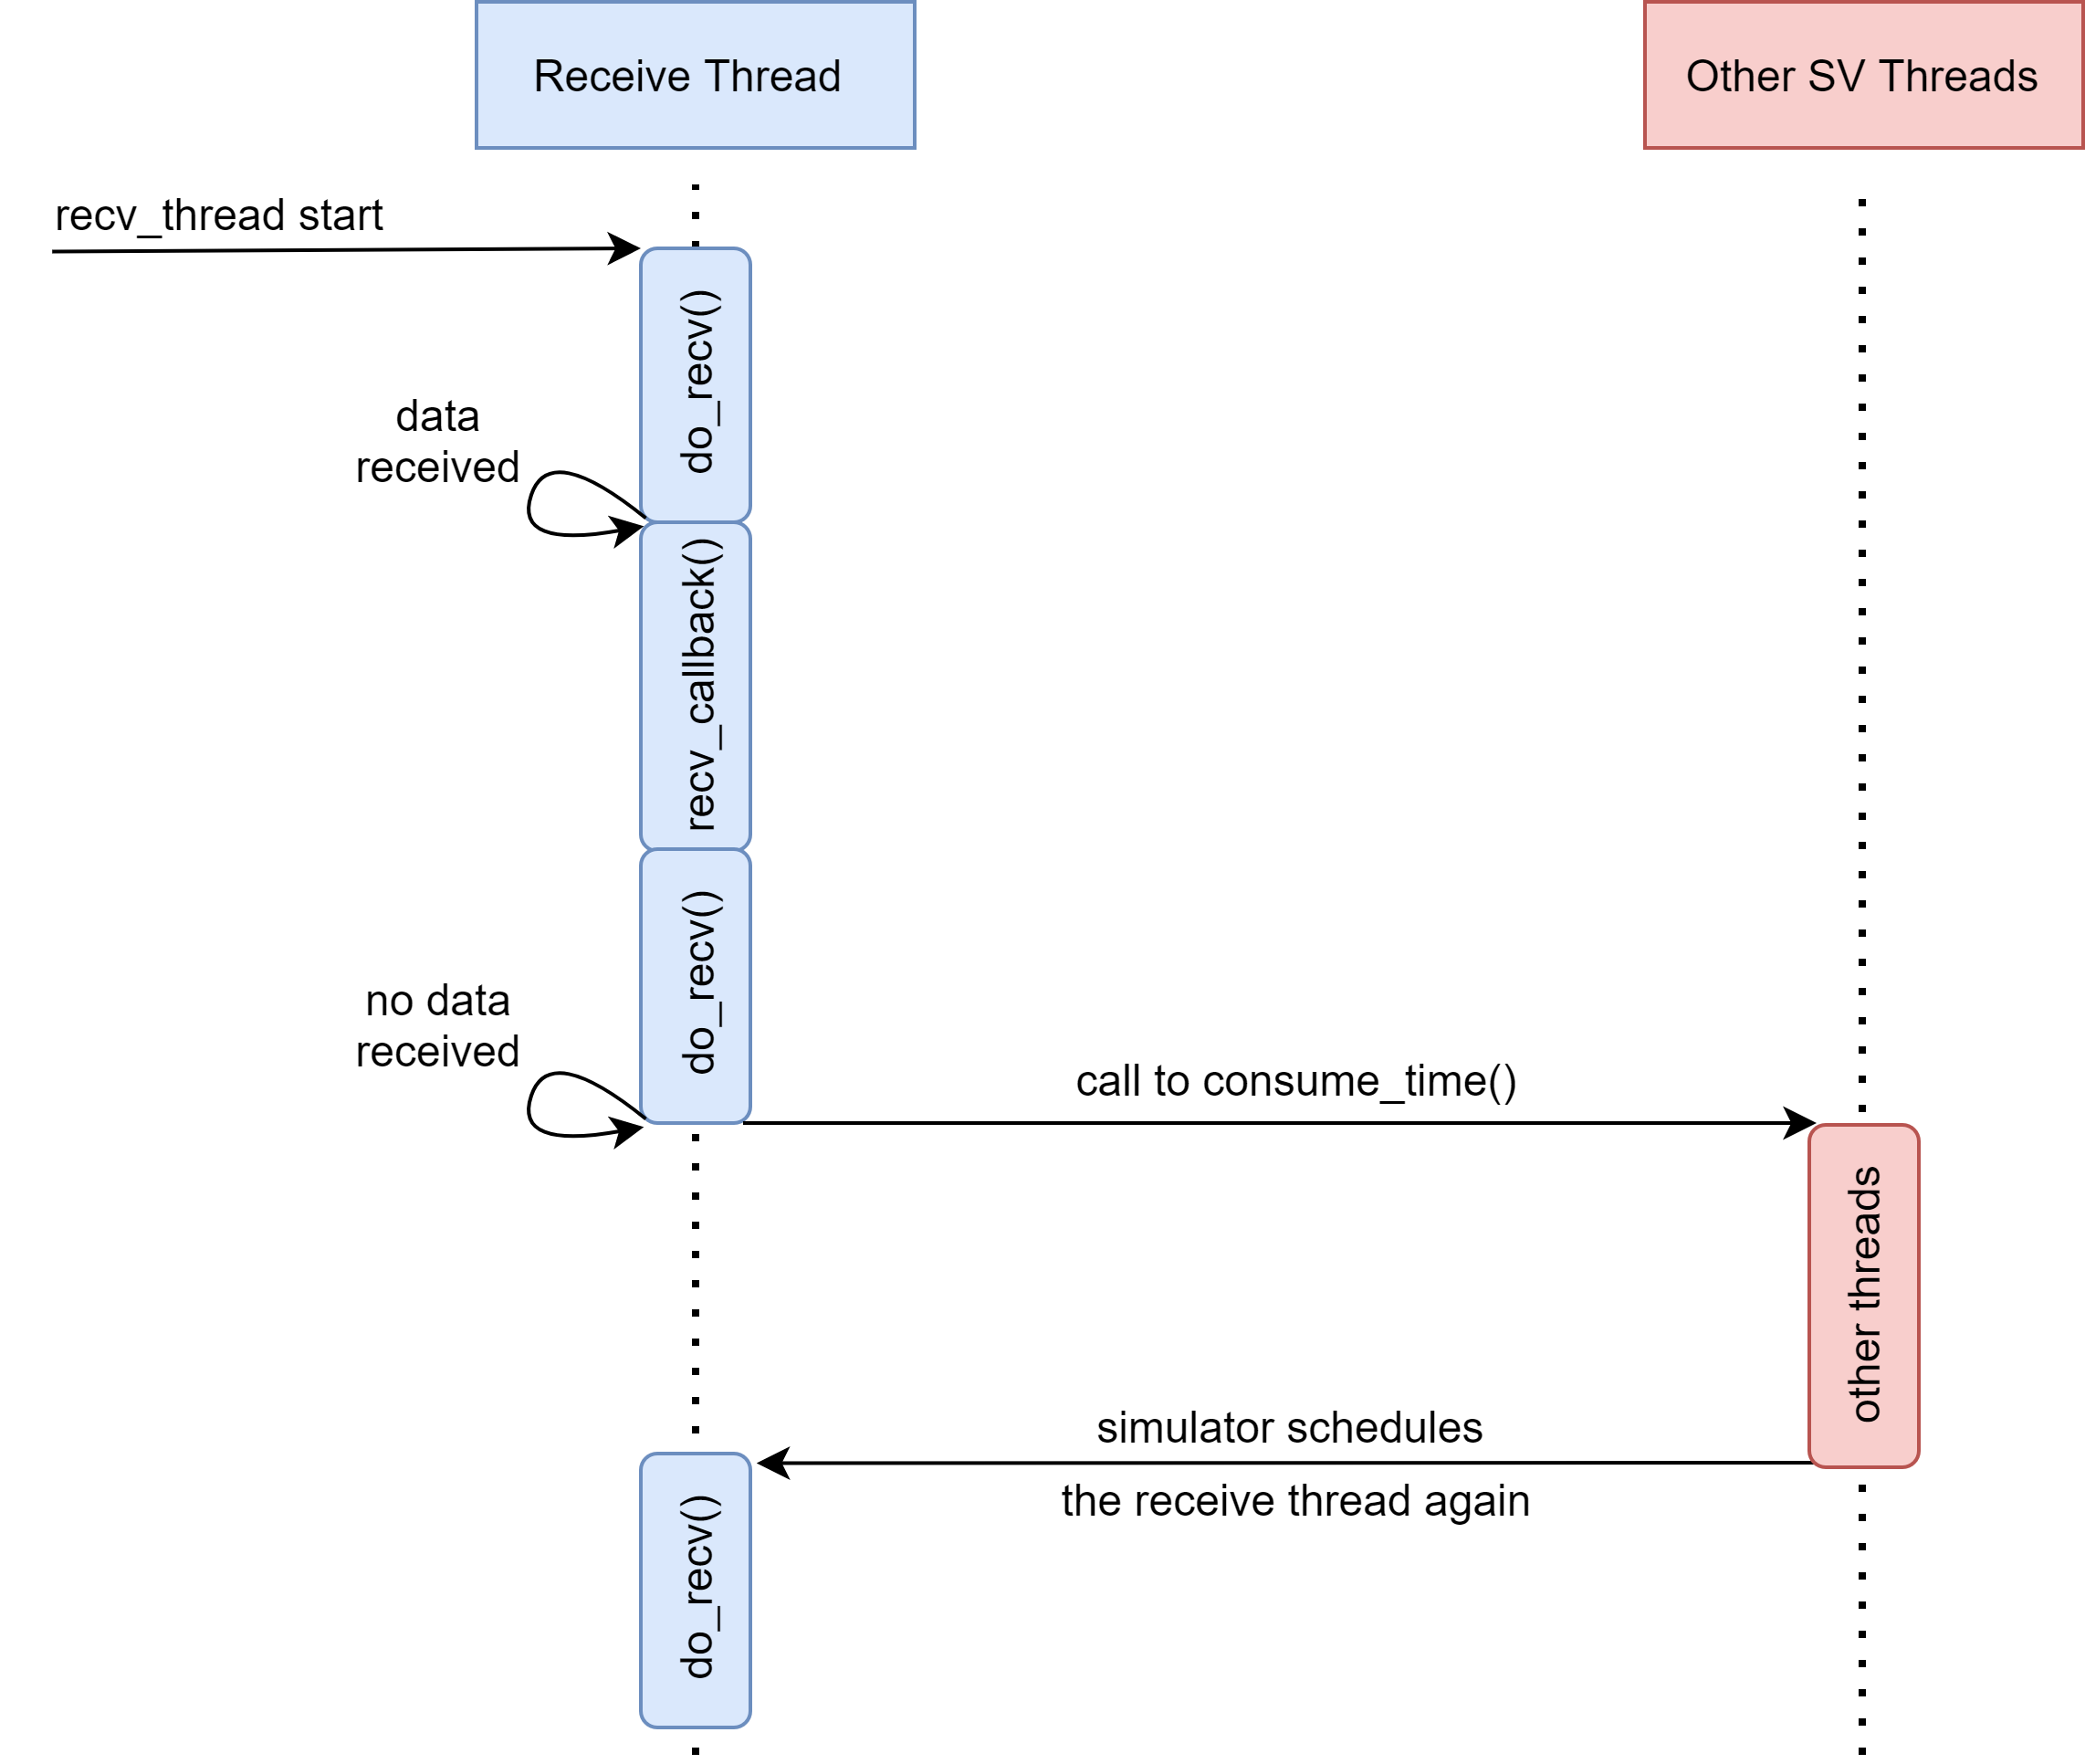
If the do_recv_forever() task does not consume simulation time, the simulator will execute the loop over and over without rescheduling other execution threads. The best way to fix this problem is to consume simulation time when no data is being received. That way the simulator has the opportunity to schedule other tasks. For this reason, the consume_time() task is exported from SystemVerilog to the DPI-C layer.
When a message is received in do_recv(), the recv_callback() function is called in order to save the message in a queue accessible to the User Layer and to trigger an event to notify that something was received.
This function is implemented in SystemVerilog and imported into the DPI-C layer.

Figure 3. Execution flow of simulator threads
The Server Layer
The server constitutes the external component that communicates with the SystemVerilog testbench. After the connection has been configured by the client, the server can process requests from the testbench or initiate a transfer independent of a client request.
The programming language used to implement the server and whether it is blocking or non-blocking is dictated by the needs of the project. For the example project described below, I used a blocking Python Server. The structure of the server is the same as that presented in the article How to Connect SystemVerilog with Python.
Example Project
To illustrate the architecture described above, I created an example project in which the SystemVerilog testbench is connected to a Python server.
To handle the connection between the testbench and the Python server, I created a class (amiq_server_connector) which takes as parameters the IP address of the server, the port, and the character used to delimit items within a message. This class contains a start() function that is responsible for initiating the connection between SystemVerilog and Python and for starting the receive thread. The amiq_server_connector communicates with the testbench through two mailboxes:
- send_mbox – for sending messages to the server
- recv_mbox – for receiving messages from the server
The SystemVerilog testbench generates items containing two fields – command and data – which are then sent to the Python Server. Depending on the command received, the server may or may not send a message back to the testbench. Either way, the SV testbench does not need to wait for a response before generating the next item.
The three commands used in this project are:
- “div”
- “nop”
- “end_test”
Upon receiving the “div” command associated with a value, the server sends back a series of messages, each of which contains a divisor of that number. If the command “nop” is received, the server does not send back any response. The “end_test” command is used for the “end of test” mechanism.
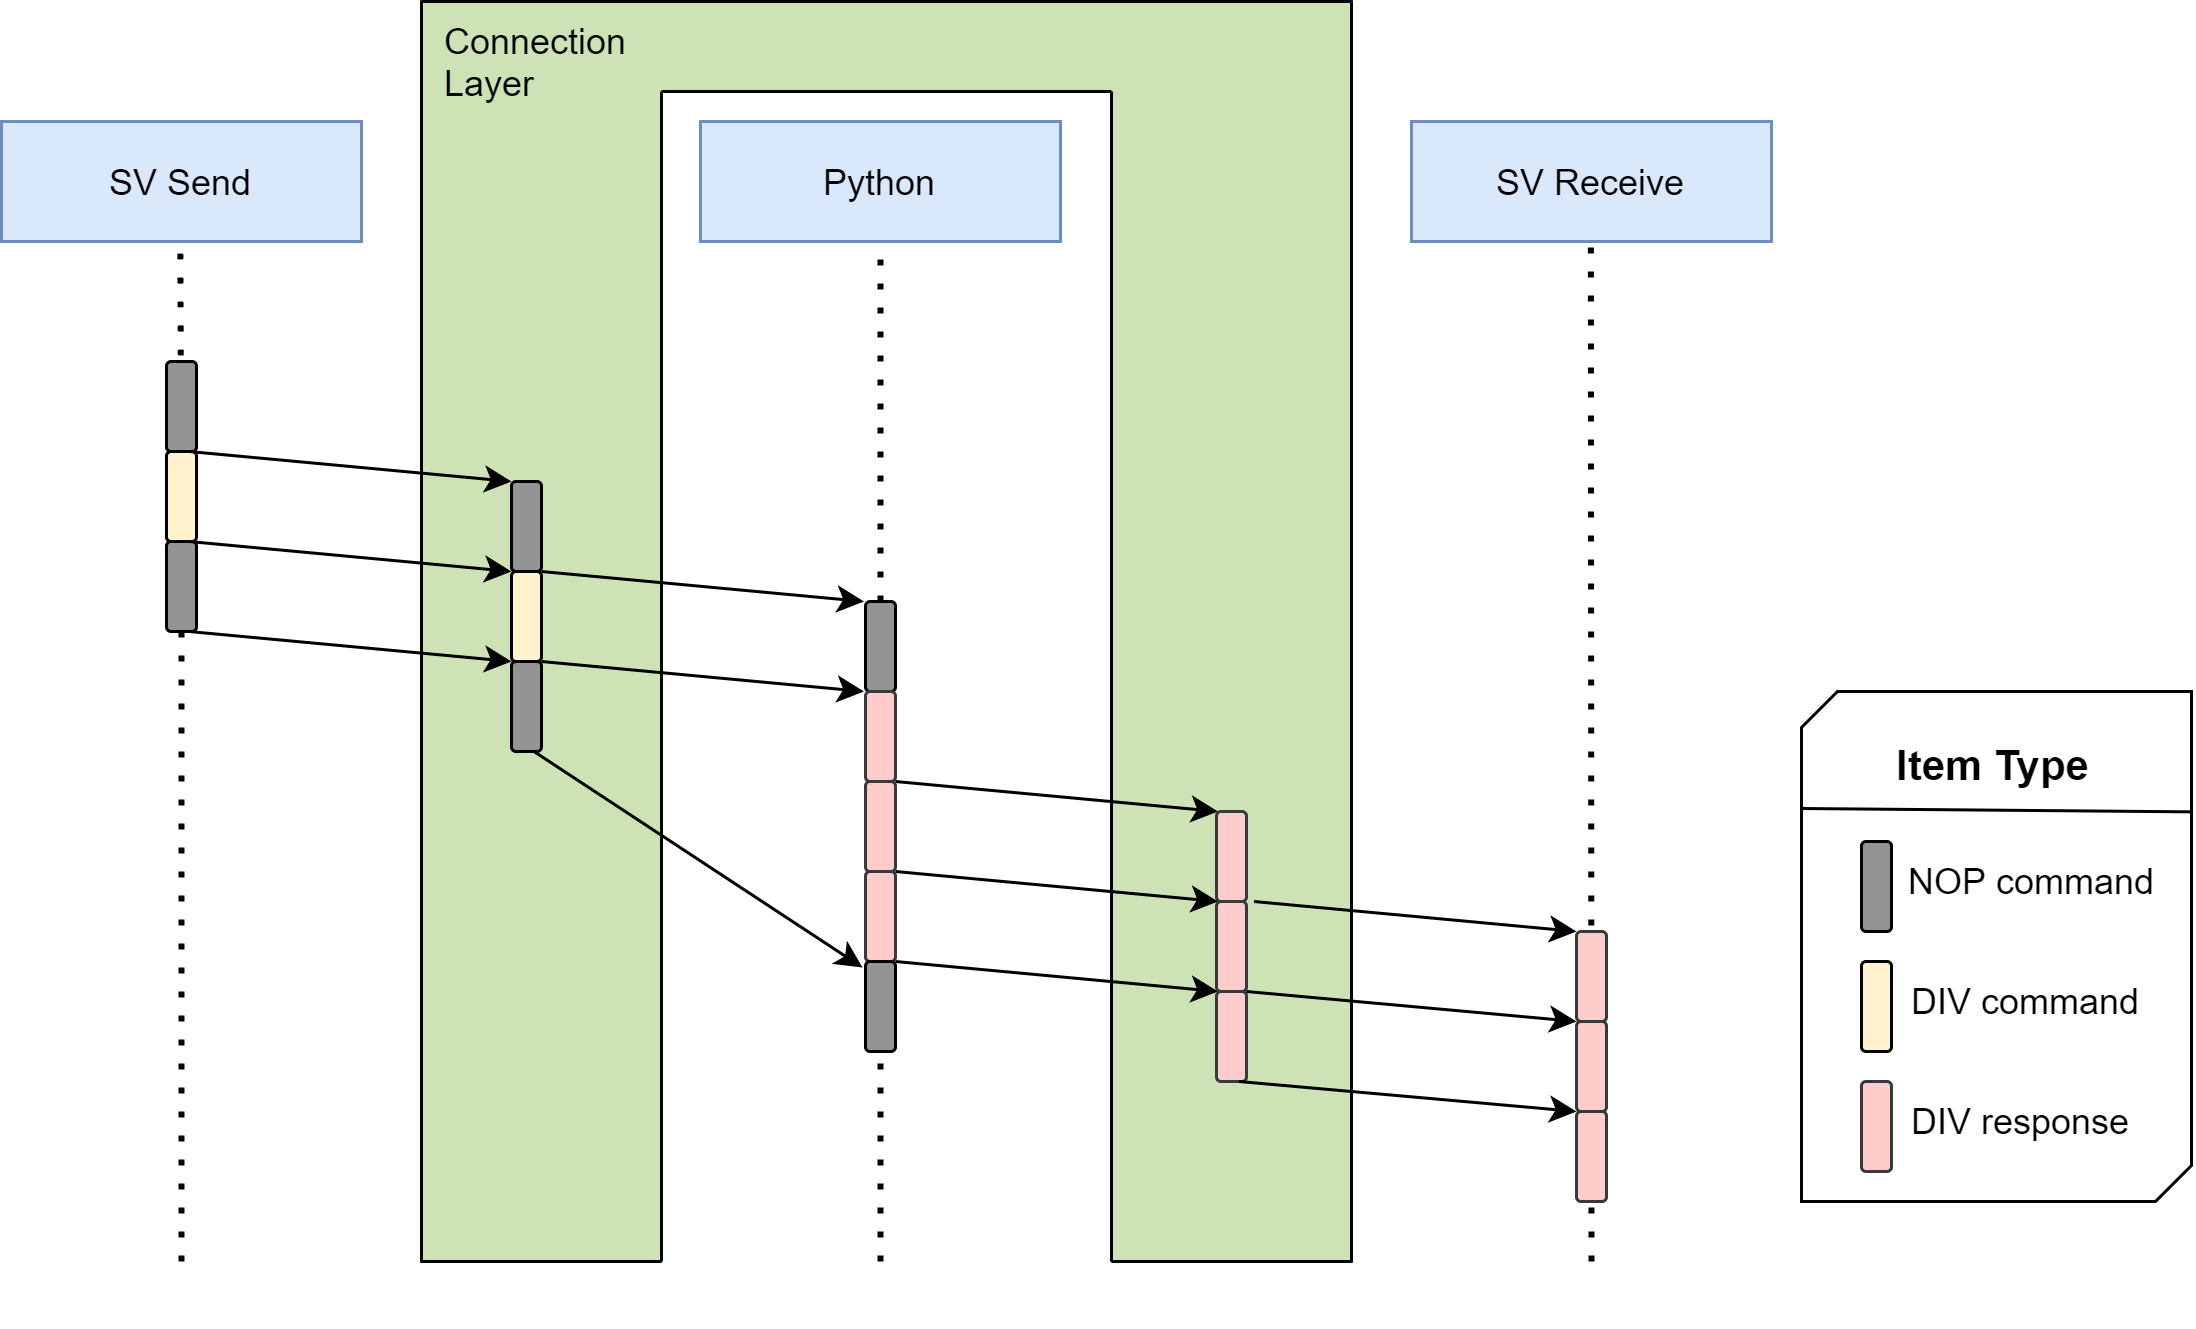
Figure 4 shows the data flow for three packets generated in the User Layer. Each packet is received and processed by the Python server according to the command received. The first and the last packets do not have an associated response, since the command is “nop”. The second packet, however, contains a “div” command and a number that has three divisors. Therefore, the Python server will create three messages, each containing a divisor of the number contained in the request. Note that the “SV Send” thread can send packets one after another, regardless of the time required for the Python server to process received packets.

Figure 4. Data flow of the example project
The “end of test” mechanism is based on the sending of a specific command, which, after being processed by the server, generates a response that the client will recognize. When the testbench recognizes this response in the received message, the test is considered finished.
The User Layer for the example project looks like this:
amiq_server_connector#(.hostname("127.0.0.1"), .port(54000), .delim("\n")) client = new();

initial begin
  fork
    // Connect to server and start communication threads
    begin
      client.start();
    end

    // Send thread:
    //   Sends 1000 items to the server through the connector's send mailbox with a random command
    //   Command can be either "div" or "nop"
    //     div: return all the divisors of the number that follows this command
    //     nop: no operation
    //   The nop command was added as a proof of concept to ensure that the system
    //   won't be blocked while waiting for a response that is not coming

    begin
      string cmd;
      for(int i=1;i<1000;i++) begin
        cmd = get_random_command();
        $display($sformatf("Sending command %s with data %3d \n", cmd, i));
        // An item has the following structure: cmd:value
        client.send_mbox.put($sformatf("%s:%0d", cmd, i));
      end

      // End of test mechanism:
      // the last item sent for processing is recognized by the server
      // after receiving this item the server sends back a particular response
      // which is recognized by the testbench

      $display("Sending end of test item \n");
      client.send_mbox.put("end_test");
    end

    // Recv thread:
    //    Collecting received items through the connector's recv mailbox
    begin
      string recv_msg;
      forever begin
        client.recv_mbox.get(recv_msg);
        $display($sformatf("Received item: %s", recv_msg));

        // End of test mechanism:
        // recognizing the end of test item as a received item
        if(recv_msg == "end_test") begin
          $display("End of test");
          set_run_finish();
          $finish();
        end
      end

  join
end
You can run this example using one of the three major EDA vendor simulators.
- Clone the repository using:
- Export the PROJ_HOME variable to the "clone_path" like this:
- Open the amiq_top.sv file and change the hostname parameter of the amiq_server_connector to "your hostname"
- Open another terminal and start the Server with:
- Run the arun.sh script with one of the aforementioned simulators:
git clone "repo" "clone_path"export PROJ_HOME="clone_path"python3.6 server.py./arun.sh -tool {xrun | questa | vcs}Download
You can download the project from AMIQ’s GitHub repository.
Conclusions
To achieve a non-blocking connection, a receiving thread needs to be started in the DPI-C layer and the simulator needs to be explicitly told when to make a context switch to avoid blocking the simulation.
As the simulation is dependent on an external component, an end of the test mechanism can be implemented based on the server’s response to a specific testbench message.
Enjoy!
- Corrigendum [December 10, 2020]: Converted send_data() function into a task.