Verification of a digital design often requires an interaction between several language domains (SystemVerilog and C, SystemVerilog and Python, SystemVerilog and e-language, etc.). This article shows you how to set up a connection between SystemVerilog and Python.
SystemVerilog is not able to communicate directly with Python. Instead, the SV code first needs to talk to a C code via a DPI-C, with the C code then able to talk to the Python code. A SystemVerilog-Python connection, therefore, needs to follow certain guidelines, otherwise, the communication will fail. A connection of this kind is shown in the diagram below.
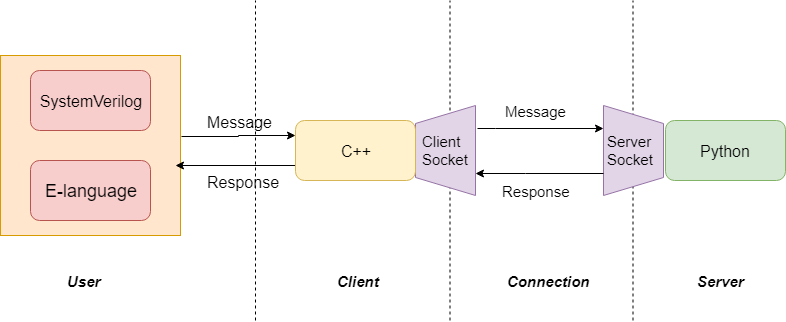
Figure 1: SystemVerilog communication workflow with Python
This interconnection is made up of 4 layers:
The User layer
The User layer is where the main verification activity takes place. It is the User layer that initiates a connection with another code written in a different programming language. The first step when initiating a connection is to invoke the call_client() function from the Client layer using the address and a port number of the server. Optionally, we can provide a message for the Server.
I will provide more detail on this in the Example Project section below.
The Connection layer
The connection between SystemVerilog and Python works like a Client-Server application connecting 2 entities. The handshake and communication flow between the Client and the Server are shown in Figure 2 below.
In this Client-Server architecture, we are going to use a concept known as socket, which is an endpoint in a network. A socket is bound to a port of the machine where the application is running.
In a Client-Server architecture, both parties must have an associated socket. Moreover, both parties must use a common protocol (TCP or UDP) to be able to understand each other, e.g. when sending and receiving data.
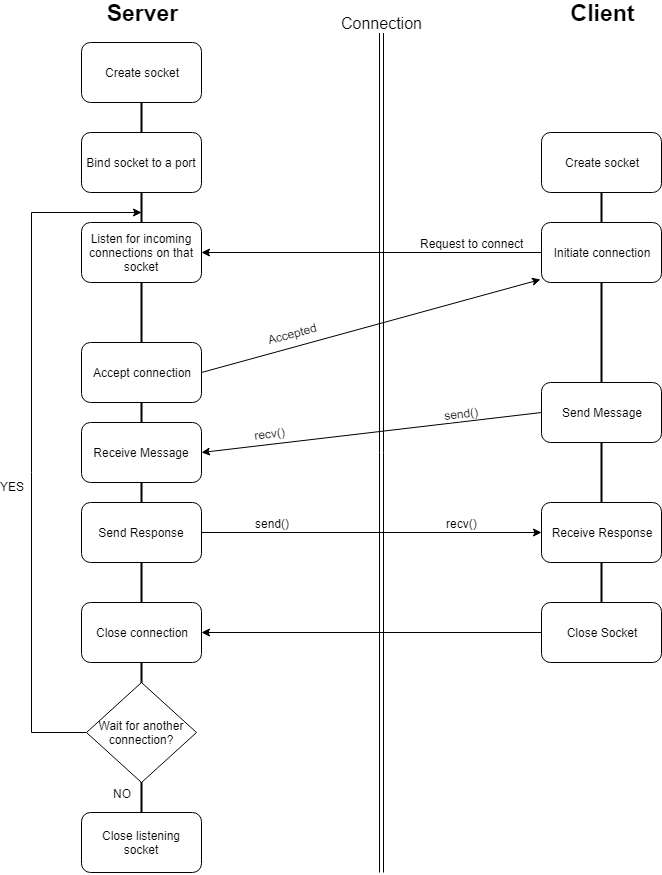
Figure 2: Client-Server communication/handshake flow
Please note that, as depicted in the diagram, the communication must be initiated by the Client. The Server can not initiate communication on its own.
The Client layer
The Client layer acts as a proxy between the User layer and the Server layer. A connection with the Server is initiated from within this layer. The Client and the User layers are connected via the DPI-C. For more information on the DPI-C, please refer to this article.
Information (port number, hostname, message to send) received from the User layer is packed into a container struct (client_config) inside the call_client() function. The call_client() function is responsible for:
- creating the client socket
- managing the connection handshake
- handling connection errors
- returning the server response to the User layer
The C code for the Client layer looks like this:
// ... more code here ...
struct sockaddr_in serv_addr; //used to connect with the Server
// ... more code here ...

///Step 1 - Creates a socket for address family AF=IPV4 and for a 2 way connection
sockfd = socket(AF_INET, SOCK_STREAM, COMMUNICATION_PROTOCOL);

///Step 2 - Preparing data connection
//Find Server’s IP
host = gethostbyname(client_config>hostname);

//Set the Server characteristics
bzero((char *) &serv_addr, sizeof(serv_addr));
serv_addr.sin_family = AF_INET;
bcopy((char *)host->h_addr,(char *)&serv_addr.sin_addr.s_addr,host->h_length);

//Converts the port number from local machine bytes to network bytes
serv_addr.sin_port = htons(client_config->port);

///Step 3 - Establish the connection between the Client and the Server
if (connect(sockfd,(struct sockaddr *) &serv_addr,sizeof(serv_addr)) < 0)
  close(sockfd);

///Step 4  - Send and receive messages
//Sending the message to the Server
nof_bytes = write(sockfd,client_config->msg,strlen(client_config->msg));

//Receiving the Server's response
bzero(client_config->received_msg,BUFFER_SIZE);
nof_bytes = read(sockfd,client_config->received_msg,BUFFER_SIZE-1);

///Step 5 - Close the connection
close(sockfd);
During Step 1, a TCP socket is created and its descriptor saved into a variable for later use.
During Step 2, the client prepares the connection data by:
- finding the IP address of the Server (the user can provide the name or the IP of the Server)
- creating a sockaddr_in structure with the Server’s characteristics. For more details of the sockaddr_in structure please refer to this link
During Step 3, the connection is established using the connect() function.
During Step 4, the Client is ready to communicate with the Server. It sends a message using the write() function and waits for a response from the Server by using the blocking read() function.
During Step 5, the Client is responsible for closing the connection.
The Server layer
The Server layer is responsible for providing a response to a User request.
After establishing a connection with the Client, the Server decodes the message received from the Client and generates the message to be sent back to the User. The Server layer and the Client layer are connected via the Connection layer.
In the current implementation, the Client is responsible for closing the connection. The Server catches this event and closes the associated connection handle. There may be different requirements for other applications (the Server is responsible for closing the connection, etc.).
In my implementation, the Python code for the Server logic is as follows:
#Step 1 - Creating and binding the socket
sock=socket.socket()
sock.bind(('',PORT))

#Step 2 - Put the socket into listening mode
sock.listen(MAX_PENDING_CONNECTIONS)

#This server listens forever
while True:
  #Step 3 - Accepting a connection
  connection_ID,client_address=sock.accept()

  #While data is transmitted
  while True:
    #Step 4 - Receive data
    data=connection_ID.recv(BUFFER_SIZE)

    #Client closed the connection
    if not data:
      break

    recv_msg=data.decode("utf-8")
    print("Message received from SV: ", recv_msg)

    #Step 5 - Compute and send the response
    response=compute_response(recv_msg)
    connection_ID.send(response.encode("utf-8"))
    print("Response sent back to client!")

  #Step 6 - Close the connection
  connection_ID.close()
  print("Connection closed!")

print("Server socket closing...")
sock.close()
During Step 1, a TCP socket is created and bound to a port. When binding the port, the developer must choose a port number and may provide a filter for incoming network connections. For more information on Python sockets, please refer to the following link.
For Step 2 I provided a maximum number of pending connections to be accepted by the Server socket. The Server will refuse any new incoming connection if the current number of inbound connections is equal to MAX_NOF_PENDING_CONNECTION. By calling the listen() method, the Server was enabled to listen to incoming connections.
During Step 3, the Server enters the listening loop. If a new connection is accepted, the Server’s accept() method returns the connection ID and the IP address for the Client.
During Step 4, I chose to implement a simple function for receiving a maximum of 512 bytes from the Client. Depending on your application and your Server implementation, this step may be implemented differently, e.g. you may want to receive multiple BUFFER_SIZE bytes data and concatenate them for further processing.
During Step 5, the response of the Server is generated and sent back to the Client.
During Step 6, the Server releases its connection handle as a result of the Client ending the communication.
Example Project
To illustrate the above architecture I have implemented a short demo testbench for the verification of a MUX RTL function.
The MUX logic looks like this:
module amiq_mux2_1(input i0,i1,sel,clk, output reg out);
  initial out=0;

  always@(posedge clk) begin
    out<=sel?i1:i0;
  end
endmodule
The basic idea behind this example is to receive the RTL stimuli data from Python. The stimuli are represented by the inputs (in0, in1, sel) and the delays between two consecutive data stimuli.
The testbench comprises three main steps:
- Setup – used to initialize variables
- Acquisition of data – used to receive stimuli from Python
- Testing – used to drive the RTL with the received stimuli
The stimuli are received as a string via a call_client() DPI-C function. The message_decoder() function then interprets the received string content and saves the decoded data into packed_stimuli
The test ends when all the received stimuli have been driven to the RTL. The source code for the application can be downloaded from here.
You can run the example using any of the three major EDA vendor simulators (irun, vlog/vsim and vcs).
- Clone the repository using:
git clone "repo" "clone_path" - Export the PROJ_HOME variable to the "clone_path" like this:
export PROJ_HOME="clone_path" - Open the amiq_top.sv file and change the HOSTNAME macro to "your hostname"
- Open another terminal and start the Server with:
python3.6 server.py - Run the arun.sh script to run with one of the aforementioned simulators:
./arun.sh -tool {irun | questa | vcs}
Why use sockets and not other methods?
Sockets
The advantages of using sockets are:
- once designed, the C/C++ layer code rarely changes, even for different use cases, leading to a lower risk of bugs compared to other methods (Shared Memory and DPI)
- the possibility of running a Python process in the background
The main disadvantage of using sockets compared with Shared Memory and DPI is application performance, i.e. it takes longer to receive data from the communication partners.
Shared Memory
An alternative to the aforementioned socket communication method between SystemVerilog and Python involves the use of shared memory. In this case, the performance of the application should improve as the delays introduced by socket communication would vanish. However, there are also some disadvantages of using this method:
- the C/C++ layer is more difficult to create. Moreover, if the application specifications change, then the C/C++ layer needs to change also
- debugging a C/C++ code is more difficult than Python code debugging
DPI
Another way of doing things would be to use a DPI between the C/C++ layer and the Python layer (e.g. pybind11). While this should improve the application’s performance, it too has drawbacks:
- it may require a lot of time to interface a large amount of Python code in C/C++ and debugging may also become difficult
- adding new features to the Python code may lead to changes in the C/C++ layer
- C code cannot interrupt the Python processes (e.g. a neural network fed with datasets from SystemVerilog cannot be implemented using DPI)
Download
You can download the code presented in this post from AMIQ GitHub repo.
Conclusions
This kind of communication between SystemVerilog and Python can be used in data analysis and GUI development, etc. The architecture presented above provides a generic solution allowing you to focus exclusively on the cross-language data encapsulation.
One could also have e-language communicating with Python, instead of SystemVerilog. I will detail how to connect e-Language with Python in a follow-up post.
Please let us know in the comments section below what kind of applications you envisage in the context of SystemVerilog and Python.
Enjoy!
11 Responses
Hello,
Do you have any examples about communicating python and e?
We’ll provide soon some working examples.
Hello!
Check out my new article on the blog: How to connect e-language with Python.
Wouldn’t it be easier to embed the python interpreter in C/C++ and then use DPI-C calls from SV to run python code directly?
(see https://docs.python.org/3/extending/embedding.html)
If you try the “Very High Level Embedding” solution you would reduce the C glue logic to a minimum as it would only be responsible with passing Python code from SV to the Python interpreter. You could then use JSON or other human readable formats to pass messages between SV and your Python application making the debugging easier. And if you want to run your Python app as a background process, you can do that from Python using the Process module. Then use Queues or Pipes to send messages to/from the Process…much easier to work with than sockets.(see https://docs.python.org/2/library/multiprocessing.html)
You could use a similar approach with other interpreted languages like Lua, Tcl, Javascript, etc.
Not sure I fully understand your comment, but if by “embed the python interpreter in C/C++” you mean to use a DPI (Direct Programming Interface) then this is mentioned in the article under the section: Why use sockets and not other methods.
The DPI method is an alternative to the socket approach, but it has some limitations. For example if you want that SV threads and Python threads to run in parallel for the whole simulation time you will have problems. This is because DPI-C function calls are blocking for the SV threads. Some applications (with client and server running on different machines) require that both language threads to run in parallel and not to wait for each other.
To embed the Python interpreter means to instantiate it in C/C++ and send Python code to it in the form of C/C++ strings. That code will be run by the Python interpreter. You can then send those code strings from SV to C/C++(via DPI-C) and then from C/C++ to Python(via the interpreter instance).
Here’s an example from the Python documentation(https://docs.python.org/3/extending/embedding.html):
This solution would fall in your "Shared Memory" category only that the C/C++ layer in this case is very easy to create and debug.
You can also use Cocotb https://github.com/potentialventures/cocotb
Thank you, I will have a look at Cocotb.
Until then, can you detail a bit to which part of Cocotb you refer to?
Dear Cristian,
>Until then, can you detail a bit to which part of Cocotb you refer to?
>>Wouldn’t it be easier to embed the python interpreter in C/C++ and then use DPI-C calls from SV to run python code directly?
This is how Cocotb works to some extent (with VPI). https://cocotb.readthedocs.io/en/latest/introduction.html#how-does-cocotb-work
Hi
Thanks for such beautiful blog.
My question is interacting sv to python through c/c++ seems to time consuming process.
What is the advantage here?
Hello, Saurabh!
I am glad to hear that you liked this post.
When using sockets, the Python and SV are 2 different processes at run-time that communicate one to another via messages (as a Client-Server application does). The big advantage introduced by this method is that the Python process can store its own variables, so one would not have to bother to load the Python variables from somewhere or to interface them with Python as it must be done in the other 2 cases (see here). Moreover, running this both processes in parallel may improve one’s application performances even though the communication between these 2 processes introduces delay. That depends on the amount of calculus that needs to be done by the Python process (i.e. as it must be done by a Machine Learning algorithm).