As you probably already know, all digital design circuits either process or transfer data, which is usually represented as a bit vector of size N. Data values that pass through the system provide an indication of how system’s functionality is exercised, so you need to add them to the functional coverage goals. You might ask yourself: “What are relevant data values should I cover?” and “Are there any relevant bit relation/patterns should I cover?” These questions are answered by means of bitwise relationships, the most important of which you’ll find in this article.
We are going to look at following bitwise coverage methods:
- Bit Toggle Coverage
- Walking-1 or Walking-0 Coverage
- Power-of-Two Coverage
- Alignment Coverage
- Duty Cycle Coverage
- Parity Coverage
- Consecutive Bit Coverage
- Bit Masking Coverage
Bit Toggle Coverage
Usage
- To indicate there is activity on a bus (e.g. during the smoke-testing phase)
Bit Toggle Coverage ensures that all the bits on the bus have toggled at least once, regardless of the relationships between toggling bits. In general, it is used to show there is activity on the bus, but does not indicate the diversity of bit toggling. A sequence that is “all-0s followed by all-1s followed by all-0s” will fill it up, as the picture below shows.
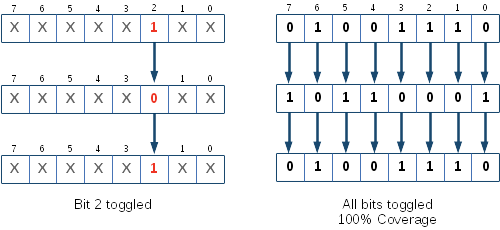
Bit Toggle Coverage can be enabled as part of the code coverage collection or implemented as functional coverage as the following code shows.
class bit_toggle_cg_wrapper; // covergroup wrapper class
   covergroup bit_toggle_cg(input int bit_idx) with function sample(bit x, int aidx);
      bit_transition: coverpoint x iff (bit_idx == aidx) {
         bins zeroone = (0 => 1);
         bins onezero = (1 => 0);
      }
   endgroup

   function new(string name="bit_toggle_cg_wrapper", int aidx=0);
      bit_toggle_cg = new(aidx);
      bit_toggle_cg.set_inst_name(name);
   endfunction

   function void sample(bit x, int aidx);
      bit_toggle_cg.sample(x, aidx);
   endfunction
endclass

bit_toggle_cg_wrapper bit_toggle_cg_w[WIDTH];

// NOTE: bit_toggle_cg_w needs to be created using new("") before calling sample_bit_toggle
function void sample_bit_toggle(bit[WIDTH-1:0] x);
   for(int i=0;i<WIDTH;i++)
      bit_toggle_cg_w[i].sample(x[i], i);
endfunction
Pros
- easy to implement
- easy to cover (2*N coverage bins)
Cons
- not reliable: it can miss cross-connected signals
- does not highlight relationships between toggling bits
- limited to integers/bit-vectors: although most code coverage collection engines support this method, it can not be used for abstract values (e.g. fields, enumerated types)
Walking-1 or Walking-0 Coverage
Usage
- To measure activity covered by bus connectivity tests
- To measure one-hot state or bus encoding coverage
Walking-1 Coverage samples the cases in which only one bit is set while others remain 0 (one-hot encoding):
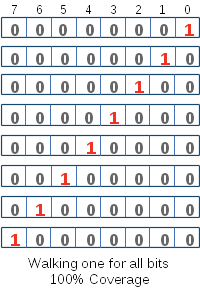
Code coverage engines do not support this type of coverage and must be implemented as functional coverage:
covergroup walking_1_cg with function sample(bit[WIDTH-1:0] x, int position);
   walking_1: coverpoint position iff (x[position]==1 && $onehot(x) ) {
      bins b[] = {[0:WIDTH-1]};
   }
endgroup

function void sample_walking_1(bit[WIDTH-1:0] x);
   for(int i=0;i<WIDTH;i++)begin
      walking_1_cg.sample(x, i);
   end
endfunction
Walking-0 coverage is complementary to walking-1 coverage: all bits are set except for one, which is zero (i.e. one-cold). It can be implemented in a similar manner to walking-1 coverage, as follows:
covergroup walking_0_cg with function sample(bit[WIDTH-1:0] x, int position);
   walking_0: coverpoint position iff (x[position]==0 && $onehot(~x) ) {
      bins b[] = {[0:WIDTH-1]};
   }
endgroup
Pros
- easy to implement
- easy to cover (N coverage bins)
- ensures each bit was toggled individually and is the only solution for one-hot or zero-hot encoded values
Cons
- extra effort required to steer generation: it is hard to cover using unconstrained or loosely constrained random generation
- reduced value space equivalent equates to reduced data diversity, meaning interesting values for the system may not be covered
Power-of-Two Coverage
Usage
- To measure activity on buses for which value ranges have no associated semantics (e.g. RAM address/data buses)
Power-of-Two Coverage associates coverage bins with value ranges that are delimited by powers of two. If we take an 8-bit example, the following ranges will be created:
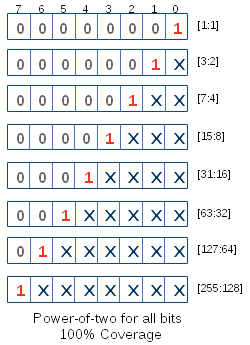
covergroup power_of_2_cg with function sample(bit[WIDTH-1:0] x, int position);
   power_of_two: coverpoint position iff (x[position]==1 && ((x&(~((1<<(position+1))-1)))==0)) {
      bins b[] = {[0:WIDTH-1]};
   }
endgroup

function void sample_power_of_2(bit[WIDTH-1:0] x);
   for(int i=0;i<WIDTH;i++) begin
      power_of_2_cg.sample(x, i);
   end
endfunction
Each coverage bin guarantees that the most significant bits are '0', the bit of interest is '1' and the less significant bits have random values (e.g. 8'b001?????, 8'b000001?? etc.). This kind of value space partitioning creates uneven coverage bins: the interval corresponding to 8'b000001?? contains 4 values (i.e. [4:7]), while 8'b001????? contains 32 values (i.e. [32:63]). This translates into a lower probability of generating and, implicitly, covering values from lower order intervals. But this is not an issue since you can use Probabilistic Distribution Functions to get around it. The e-Language version of distribution based constraints can be found in the article entitled Coverage Aware Generation using e Language Normal Distribution Constraints.
Pros
- ensures that each bit has been 1 irrespective of the values of the least significant bits
- only N coverage bins to cover
Cons
- None
Alignment Coverage
Usage
- To measure values used within an N-bit/byte aligned context
Alignment Coverage indicates a value's alignment to a given constant. The condition that indicates alignment is value%N == 0, where % is the modulo operation and N is the alignment constant. The result of value%N falls within the [0:N-1], which gives us N values or coverage bins.
Let's consider the case of a memory with 2 buses: an internal and an external one. The internal bus is a 4-byte aligned address bus and the external bus is byte aligned. For this case N=4 and you should fill up 4 coverage bins: [0,1,2,3].
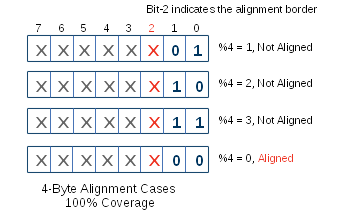
You can implement this type of coverage as follows:
covergroup alignment_cg(input int align) with function sample(bit[WIDTH-1:0] x);
   alignment: coverpoint (x%align) {
      bins b[] = {[0:align-1]};
   }
endgroup

function void sample_alignment(bit[WIDTH-1:0] x);
   alignment_cg.sample(x);
endfunction
With a power-of-two alignment (e.g. 2, 4, 8, etc.) you can visually check the alignment on the waveform: the least significant x bits, where N=2^x, must be zero in order to be aligned.
Duty Cycle Coverage
Usage
- To measure signal activity
A duty cycle is the percentage of one period for which a signal is active. The figure below depicts one period of a signal or a pulse:

Halt or back-pressure signals should be measured because their activity indicates the level of stress a resource is under. In this case you might need to collect data over an extended time window, not just one period. The figure below shows one such case:

In both cases, duty cycle coverage requires counting the 1s within the time window and dividing this number by the bit-length for the window, as follows:
covergroup duty_cycle_cg with function sample(int duty_cycle);
   duty_cycle: coverpoint (duty_cycle) {
      bins b[10] = {[0:99]};
   }
endgroup

function void sample_duty_cycle(bit[15:0] x);
   int unsigned count = $countones(x), duty_cycle=0;
   duty_cycle = ((count * 100 )/16);
   duty_cycle_cg.sample(duty_cycle);
endfunction
For longer time windows it might not be efficient to calculate the duty cycle at the end of the window. In this case, you should calculate it over smaller intervals and update the duty cycle from one interval to the next. This can be achieved using code such as this:
int unsigned bit_count = 0;
int unsigned window_length = 0;
int unsigned duty_cycle = 0;
function void sample_duty_cycle(bit bits[$]);
   bit_count += bits.sum();
   window_length += bits.size();
   duty_cycle = (bit_count*100)/window_length;
   // sample duty_cycle when target window size is reached
   if (window_length >= target_window_size)
      duty_cycle_cg.sample(duty_cycle);
endfunction
Parity Coverage
Usage
- To indicate amount of 0s or 1s contained by values
The parity of an N-bit value indicates whether the value contains an odd (odd parity) or even(even parity) number of 1-bits. Depending on the value of N, there will be either N/2 or N/2+1coverage bins that need to be covered, as the table below shows:
| N bits | Odd Parity Coverage Bins | Even Parity Coverage Bins |
|---|---|---|
| 1 | 1 | 0 |
| 2 | 1 | 0,2 |
| 3 | 1,3 | 0,2 |
| 8 | 1,3,5,7 | 0,2,4,6,8 |
| 15 | 1,3,5,7,9,11,13,15 | 0,2,4,6,8,10,12,14 |
Whether you choose between odd or even parity depends on the application. Below is the code for the odd parity only:
covergroup odd_parity_cg(input int bitwidth) with function sample(int aparity);
   parity: coverpoint (aparity % 2) {
      bins is_even = {0};
      bins is_odd = {1};
   }
   parity_amount: coverpoint (aparity) {
      bins b[] = {[1:bitwidth]} with (item % 2 == 1);
   }
endgroup

function void sample_odd_parity(bit[WIDTH-1:0] x);
   int unsigned count = $countones(x);
   odd_parity_cg.sample(count);
endfunction
You can also create a transition coverpoint to measure parity sequencing (e.g. odd => even => odd).
Consecutive Bit Coverage
Usage
- To measure bit group size
There are cases, as with a 1-bit serial bus, where you need to identify and cover bit groups within a time window. Groups are N consecutive 1s or 0s and there can be more than one group within a value. Coverage of bit groups includes the size of the bit group and the number of bit groups, as can be seen from the code below:
covergroup consecutive_bits_cg(input int limit) with function sample(int nof_1_bits, int nof_groups);
   nof_consecutive_bits: coverpoint (nof_1_bits) {
      bins b[] = {[0:limit]};
   }
   nof_bit_groups: coverpoint (nof_groups) {
      bins b[] = {[0:WIDTH/2+WIDTH%2]};
   }
endgroup

function void sample_consecutive_bits(bit[WIDTH-1:0] x);
   int unsigned count = 0, nof_groups = 0;
   int unsigned counta[$];
   if (x == 0 || x == {WIDTH{1'b1}}) begin
      consecutive_bits_cg.sample((x == 0)?0:WIDTH, (x == 0)?0:1);
      return;
   end
   for(int i=0; i<WIDTH; i++) begin
      count += x[i];
      if ((x[i] == 0 || (i == (WIDTH-1))) && count != 0) begin
         nof_groups += 1;
         counta.push_back(count);
         count = 0;
      end
   end
   foreach(counta[i])
      consecutive_bits_cg.sample(counta[i], counta.size());
endfunction
Bit Masking Coverage
Usage
- To measure the inputs into a masking function (e.g. frame filter: forward or drop Ethernet frames by MAC address)
Bit Masking Coverage indicates how a test value relates to a reference value given that the matching of the two takes into account a pattern called a mask (static, dynamic or configurable). The mask is applied to both test and reference values. The resulting masked values are compared to whether or not they are equal, as shown in the figure bellow:
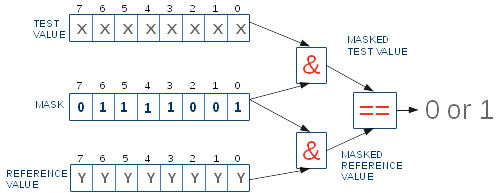
Two aspects need to be clarified upfront: the mask granularity and the mask interpretation.
The mask granularity tells you how each mask bit is mapped to the bit-vector representing the values, as in the following examples:

The mask interpretation can be either a) select the bits to be compared or b) select the bits to be ignored in the comparison (i.e. the reverse of a)).
Using the above implementation, one option could be to cover the cross between bits and the masking result: cross test_value[i], mask[i], reference_value[2], masking result, where i is between 0 and the bit-width of the values. Another option is to cover a reduced set of mask values cross with masking result; the reduced set of mask values could be all-0s, all-1s or walking-1. An example implementation of the second option is given below:
covergroup masking_cg with function sample(bit[WIDTH-1:0] x, int position, bit amasking_result);
   mask: coverpoint position iff (x == 0 || x == {WIDTH{1'b1}} || ($onehot(x) && x[position-1] == 1) ) {
      bins zero = {0};
      bins w1[] = {[1:WIDTH]};
      bins all1 = {WIDTH + 1};
   }
   masking_result : coverpoint amasking_result {
      bins no_match = {0};
      bins match = {1};
   }
   mask_vs_result : cross mask, masking_result {
      ignore_bins all_pass = binsof(mask) intersect {0} && binsof(masking_result) intersect {0};
   }
endgroup

function void sample_mask(bit[WIDTH-1:0] x, bit masking_result);
   if (x == 0) begin
      masking_cg.sample(0, 0, masking_result);
      return;
   end
   if (x == {WIDTH{1'b1}}) begin
      masking_cg.sample({WIDTH{1'b1}}, WIDTH + 1, masking_result);
      return;
   end
   for(int i=0;i<WIDTH;i++)begin
      masking_cg.sample(x, (i+1), masking_result);
   end
endfunction
Utility Class for Bitwise Coverage
I've created a short example on how to use the above bitwise coverage methods. You can view and download the example's source code from AMIQ's GitHub.
All that's left now is to decide which coverage pattern should become part of your project's verification goals.
PS: In addition, I also recommend you read this Bithacks article containing a comprehensive bitwise operation list, as compiled by Sean Eron Anderson.
16 Responses
Hi,
Good article. It would be good if you can explain the implementation with some description and comments. Also, it would be good if you can provide some working example for each of these patterns.
Thanks,
Madhu
I think the article already contains everything you need.
Awesome article full interesting and useful details (like bithacks article), great job, thank you very much for sharing
Thank you so much for sharing very useful information .
Great Job.
Hi Stefan,
Awesome job, once more !
Thanks a lot.
BR.
Great article! Thanks so much for sharing on that. This would help a lot of people, but there’s a bug in the code in the sample for collecting the bit toggle coverage:
function void sample_bit_toggle(bit[WIDTH-1:0] x);
for(int i=0;i<WIDTH;i++) begin
bit_toggle_cg_w[i].sample(x[i], i); // Originally, this line was "bit_toggle_cg_w[i].sample(x, i)"
end
endfunction
Anyway, thanks a lot!
Hi, Kazuki.
Thank you for sharing your appreciation and for indicating the bug.
It is now fixed.
Hi, novice question.
To collect a coverage of, let’s say “parity coverage” pattern, I need to call for ‘sample_odd_parity’ function in my code, right? How do I do that? In ‘always’ block?
Igor, Hi!
You can call the ‘sample_odd_parity’ in your code, in a method, task or always. You should call it as soon as you have all the data that you want to compute the parity for.
/Stefan
Hi, Igor.
Yes, you need to call sample_odd_parity(). The place where you call it is up to you. It can be an always block. It can be inside a task or inside a function.
Usually, in verification, coverage is sampled inside a task from the coverage collector class. And as, Stefan mentioned you should call the function when your parity data is ready for sampling.
Indeed , really good example for budding Engineers like us and thanks to AMIQ for this wonderful article.
Nice. This article is also useful if you need to write some software memory tests.
for bit toggle coverage , I think there’s a typo?
bit_toggle_cg_w[i].sample(x, i);
should be :
bit_toggle_cg_w[i].sample(x[i], i);
Thank you Jeff. It was reported some time ago and got fixed, but for some reason the buggy text came back. It is now fixed again.
thank you for the information
In the code,
class bit_toggle_cg_wrapper; // covergroup wrapper class
covergroup bit_toggle_cg(input int bit_idx) with function sample(bit x, int aidx);
bit_transition: coverpoint x iff (bit_idx == aidx) {
bins zeroone = (0 => 1);
bins onezero = (1 => 0);
}
endgroup
what is the advantage of using iff(bit_idx == aidx) ?