This post proposes a recipe to check the quality of a UVM verification environment code in an agile, continuous integration fashion. The proposed solution uses the Verissimo linter as a SystemVerilog/UVM code linter, Gerrit as a trigger for code quality checks (i.e. linting) and Jenkins as a Continuous Integration orchestrator.
Architecture and Sequence Flow
First of all, we defined a HW architecture, to install and configure all the tools required. Figure 1 depicts the HW Architecture on which the proposed Continuous Integration (CI) System is based.
The following HW and SW tools are required:
- Git
- Gerrit
- Verissimo
- Jenkins
- All tools should be installed on a Linux distribution with at least 4GB of RAM and 50GB of drive space
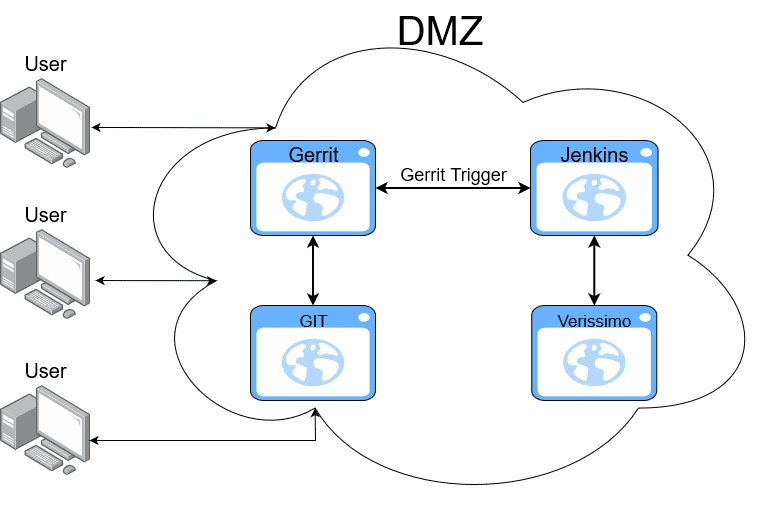
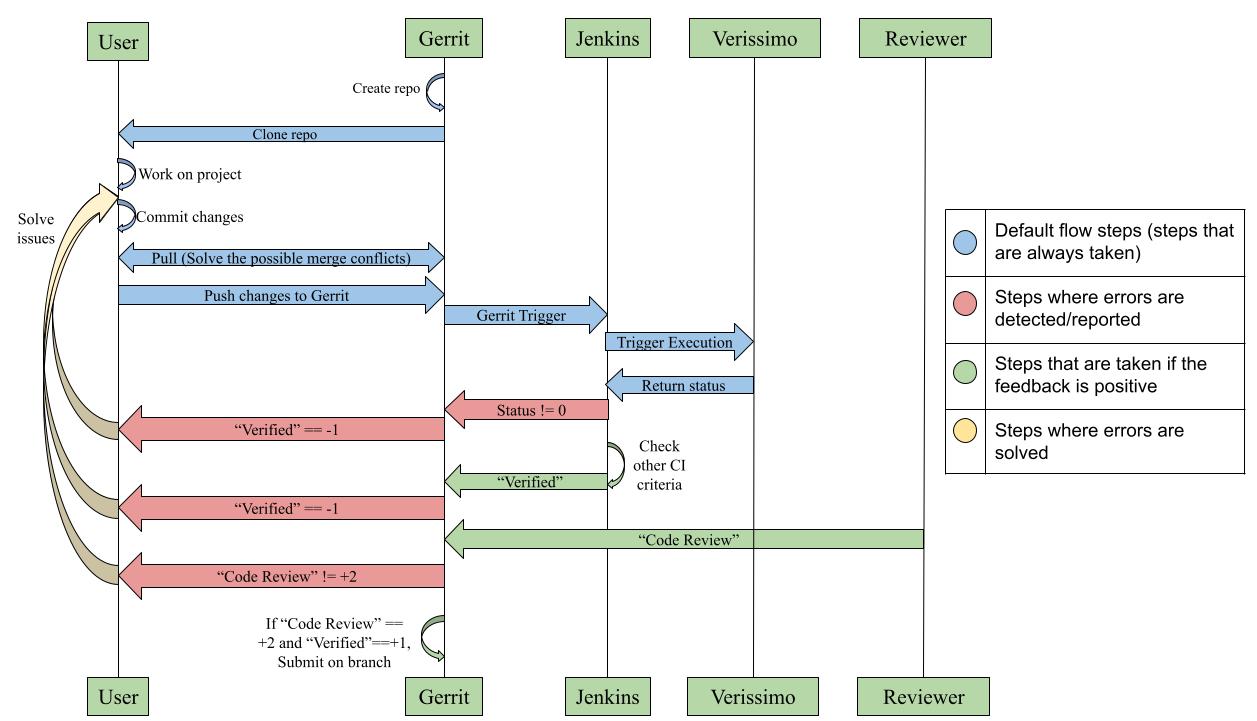
The proposed CI process detects code quality issues as soon as an engineer pushes the code changes to the GIT server. The CI quality flow (shown in the following sequence diagram) has been tested and proven to be suitable for our verification projects.
Git
For Git there is no need for a special setup, you can use the default configuration you already have.
Jenkins
Jenkins is an automation server that facilitates CI. In the proposed CI flow, Jenkins automates the repetitive task of checking that code obey the coding rules [some of them defined as Verissimo rules].
The first step is to create a user for the Jenkins server and generate an SSH key for this user.
The second step is to install Jenkins and the following plugins: Git plugin version > 4.11, Pipeline, Gerrit Trigger, Durable Task, and Mailer.
Gerrit
Gerrit is a code collaboration tool that facilitates user interaction with Git. It is a middleman between the local repository and the remote repository. Through Gerrit, project members can give feedback on any set of changes one pushes to the remote repository. This way, changes can be approved or rejected, thus filtering issues that the human eye can catch.
After installing Gerrit, make sure you also install the webhooks plugin and create a user for the Jenkins server. Add the SSH key that was previously generated for the Jenkins user. You can also add this user to the Service Users group (create this group if it is missing by default).
The human interaction can be achieved via the Code Review label and comments left on code patches. The CI system can be integrated with Gerrit, so users can check the project’s status easier. To achieve that, add a label called Verified which is going to be the vote Jenkins gives after testing the set of changes uploaded by a project member.
Navigate to the All Projects project, give the Jenkins user (or the Service Users group) read permissions, and allow it to modify the Verified label.
Steps to Link Jenkins and Gerrit
- Navigate to Dashboard -> Manage Jenkins -> Gerrit Trigger
- Press Add New Server
- Enter a name for the server and select Gerrit Server with Default Configurations
- The most important configurations from the webpage that opens after pressing Create are Frontend URL, SSH Keyfile, and SSH Keyfile Password
- The Frontend URL is the URL of the Gerrit server you use to manage repositories. Its SSH port is the default one: 29418
- SSH Keyfile is the path to the Jenkins’ user ssh key which you can find on the virtual machine on which Jenkins runs
- SSH Keyfile Password is the password for the private key file. Set to an empty value if there is no password
- When you finished configuring the server, press the Test Connection button and check if everything is in order
- Press Save
How to Setup the Pipeline
- Navigate to the Dashboard
- Click on the New Item button from the dashboard
- Give it a name
- Select Pipeline
- Click OK
Discard Old Builds
- Manages the disk space usage
- Select Log Rotation
- Set the number of days and the number of builds that you wish Jenkins to keep
- Builds are deleted after the set amount of time or if their number exceeds the limit you set
Build Triggers
- Responsible for triggering/launching the Job’s execution
- Select Gerrit Event if you want to start the job when a change is uploaded on Gerrit
- When asked to Choose a Server, select the already configured server
- Press the button Add under the Trigger on section, and select Patchset Created (or any other option on which you wish to trigger the Job)
- The next step inside the Build Triggers menu is selecting the Project to Trigger on
- Here, Jenkins identifies the projects present on Gerrit. Select the project you want and the branch
- If you want to trigger on more than one project, select the Add Project button and add another project
Advanced Project Options
- A Job’s name must not include spaces or special characters
- To have a different name displayed, go to Advanced Project Options, click on Advanced, and write the name you wish to be displayed.
Pipeline Definition
- To define the Pipeline, select Pipeline Script from the Definition tab
- To improve re-usability, create a repository that contains a shared library. A shared library can consist of functions and pipeline definitions, along with other configuration files. For examples of pipelines, check the AMIQ Shared library that I created
- Select one already implemented flow and provide the required parameters
- If you want to define your custom pipeline, you can still use functions implemented in the shared library
- Also, remember to check Use Groovy Sandbox, so you do not need to wait for the approval of an administrator to save your pipeline configuration
Example of a Pipeline Definition
pipeline {
  agent any
  stages {
    stage('Build') {
      steps {
        sh 'echo execute your build steps here'
      }
    }
    stage('Test') {
      steps {
        sh 'echo execute your test steps here'
      }
    }
  }
  post {
    failure {
      sh 'echo the build has failed'
    }
    always {
      sh 'echo always execute this'
    }
  }
}
Example of a function that defines a Pipeline
@Library("amiq_shared_library") _
optimized_pipeline(
  gitURL: "<repository_url>",
  sanityTestSeed:'<seed_value>',
  sanityTestName:'<test_name>',
  vsif:'<relative_path_to_vsif>',
  mailTo:"<comma_separated_list_of_email_addresses>"
);
Skipping Steps in a Pipeline
There may be use cases when quickly pushing some changes without checking the entire functionality of the project is needed (e.g. if the pipeline runs as usual, there would be failures and the changes could not be submitted, but those changes are necessary now). There is a way to skip the execution of certain steps that are known to fail. I implemented a function that searches for user defined keywords in the commit message, and enables or disables the corresponding pipeline stage.
Here is an example of how I used a function that returns true if it finds the string NOLINT in the commit message to disable the linting stage.
## Function definition
def call (string commit){
  List commitMsgPre = commit.split(" ")
  for(int i = 1; i < commitMsgPre.size(); i++){
    if (commitMsgPre.getAt(i) == "NOLINT"){
      println('FOUND NOLINT')
      return true;
    }
  }
  return false;
}
#-----------------------------------------------#
## Usage
stage ("Linting"){
 when{
   expression{
     hasNOLINT(commit) == false
   }
 }

 steps{
  script{
   try{
    linting()
   }
   catch(Exception e){
    sh 'cat $WORKSPACE/CustomReport.txt;
        exit 1'
    echo e.toString()
   }
  }
 }
}
Verissimo Systemverilog Testbench Linter
To achieve high quality of the verification codebase engineers should follow strict methodology and coding rules and also spend time to make sure the rules are implemented. A SystemVerilog compiler can point to language-specific syntactic and semantic errors. This is a useful capability since the language provides powerful constructs and high-level programming flexibility. However, this is not a mark of code reliability and maintainability, because it cannot say if the best coding practices have been implemented and are in compliance with UVM’s recommended coding style.
Verissimo SystemVerilog Testbench Linter is a tool that ensures engineers are consistent in their coding and they follow the best practices in code development. Verissimo translates the text-defined methodology and coding rules, into runnable checks that can be automatically applied to code upon a commit or a push of the code. Thus Verissimo saves code review time and signals problems before the verification code enters production flow.
Integration
To make use of the Verissimo capabilities, integrate it in one of the pipeline’s steps. Here is an example how:
stage('Lint') {
  steps {
    sh 'verissimo.sh -cmd $WORKSPACE/<path_to_simulation_options_file>
          -ruleset $WORKSPACE/.dvt/utils/lint/<ruleset_file>.xml
          -waivers $WORKSPACE/.dvt/utils/lint/<waivers_file>.xml
          -gen_custom_report <path_to_Custom_Report>.txt.ftl'
  }
}
The example also shows the usage of Custom Reports in Verissimo. Printing the failures in a custom way is an advantage of Verissimo, because it reduces the debug time.
Custom Report Example
Here it is an example of a Custom Report template that is passed on as argument (it needs to be saved in a file with the extension .txt.ftl) :
<#list linter.getHits() as hit>
<#assign check = hit.getCheck()>
<#if check.getStatus()=='ERROR'>
${check.getTitle()}
${hit.getFile()} line: ${hit.getLine()}
_____________________________________________
</#if>
</#list>
After the Pipeline’s execution, Verissimo prints in Jenkins’ console the rules that fail, along with the file and the line where the issue was detected:

Verissimo Return Code
By default, Jenkins uses the return code of each step inside the pipeline to determine whether a build is successful or not. You can configure the pipeline to fail as soon as one of the steps fails using the failFast option.
Verissimo can return multiple status codes at the end of its execution, since not all failures are detected as Errors; there can also be Warnings, Internal Errors, Infos etc.
One can make use of this capability and create different pipeline scenarios based on the Verissimo’s return code. It is probably best to stop the execution when there are errors, but for warning, Jenkins can return Verified 0 along with a Gerrit comment regarding the detected warnings.
Conclusions and future work
The work done so far validated the proposed CI flow and our expectations on the improvement of maintainability and the reduction of code review effort. A similar CI flow is used in AMIQ training/internship programs and by Verissimo customers. Also, in our usage scenario we have started with a baseline set of rules and, in the spirit of continuous improvements, enhanced it with new rules as the project progressed.
Enjoy!