This article is a follow-up on the paper presented at DVCon EU 2022 entitled How creativity kills reuse – A modern take on UVM/SV TB architectures. As promised at the presentation, albeit with some delay, we have uploaded on GitHub the library that implements the presented architecture together with an usage example.
The proposed architecture and implementation are the refined result of years of experience in corporate verification projects.
Introduction
We’re pleased to announce the first release of the Externally Controlled TestBench (i.e. ECTB) architecture implementation. The ECTB library provides the framework that enables an externally control layer on top of a UVM TB, pushing the boundaries of what is possible with the current available tools, architectures and methodologies.
ECTB came to life from the idea that the verification environment should allow to plug-in custom tools, while still be SV/UVM-compliant. Here is the list of requirements ECTB fulfills :
- be able to use existing techniques and algorithms available in other languages without the use of DPI and multi-language support and without having to undergo massive changes in how the TB is structured.
- open the SV/UVM verification process to applications outside the simulator world.
- provide a higher level control layer that can be easily organized and automated
- provide exactly what PSS promised, but [so far] failed to deliver
ECTB achieves all these goals while it improves the user experience and the ease of adoption.
User Guide
Installation
In order to use the library, download/clone the GitHub ECTB repo and start using it like any other SV/UVM-compliant library/VIP.
Library structure
The structure of the available library features the following dir’s:
- scripts/ – Stores various scripts that we use to automate the creation of scenarios as well as coverage closure (Note: This will be the subject of future articles)
- sim/ – Contains some examples of sim_args and a regression file for a given simulator
- sv/ – Source directory of the amiq_ectb library. This is the dir that contains the packet to be imported for the library usage. Compile and import the amiq_ectb_pkg.sv in your TB.
- example_tb/ – An example TB created to test and showcase the usage of amiq_ectb framework.
- tb/src/ – Sub-dir of the example TB that contains the TB top.
- tb/sv/ – Sub-dir of the example TB that contains the environment and other components excluding the VIPs.
- tb/sv/seq_lib/ – Sub-dir of the example TB that contains the virtual sequences which instantiate, constraint and use the VIP “physical” sequences.
- tb/sv/tb_vip_blue/ – Sub-dir of the example TB that contains a generic VIP.
- tb/sv/tb_vip_purple/ – Sub-dir of the example TB that contains a generic VIP.
- tb/sv/tb_vip_red/ – Sub-dir of the example TB that contains a generic VIP.
- tb/tc/ – Sub-dir of the example TB that contains the test and an example collection of plusargs that build an env and constraints and schedules the sequences to create a scenario.
Available classes
The library features base classes that would replace the basic uvm_* components that you would normally extend from. These classes are the following:
- amiq_ectb_component – Extended for any misc component like a custom monitor, a scoreboard, a coverage collector, a responder or any other components that might have nested objects/components and variables which require control from an upper layer. Features a predefined build_phase that enables the creation of components dynamically with our framework.
- amiq_ectb_environment – Similar to the component, features the same functions and has the same capacity, but it is built on top of uvm_env instead of uvm_component. This is the main class that has to be extended for creating a completely dynamic and scaling environment.
- amiq_ectb_object – Extending from this base class allows the user to have control over the value of any field variable that has been registered in the flow
- amiq_ectb_sequence – Similar to the object as far as functionality goes, but usable for sequences.
- amiq_ectb_test – The most important piece of the puzzle, and the base class for the test. Extending from this object allows our sequence scheduling system to be used and allows the dynamic creation of any scenario possible. In this architecture, this is the base test and all scenarios are being dynamically defined from text files or from the command line.
How to get started
Since the framework is built on top of uvm, the first and main requirement of adopting this work flow is to extend the relevant classes from the amiq_ectb classes, instead of the uvm ones. These classes provide helper functions which aim at delivering a dynamic TB and an external control layer for the environment and the scenarios.
Dynamic environment
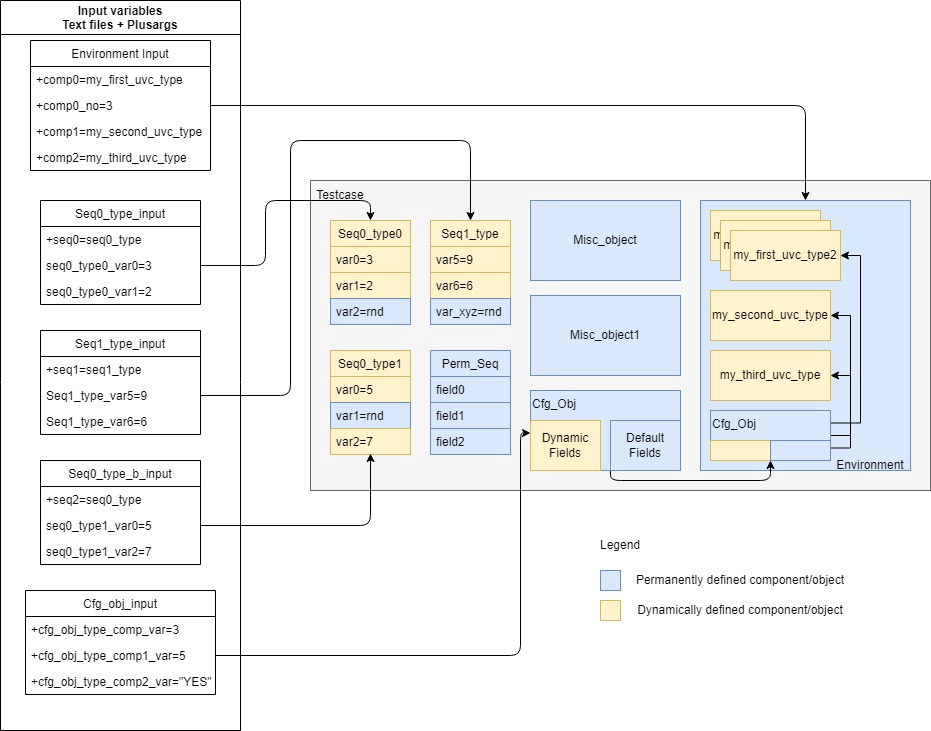
Figure 1. Dynamic environment example
The first important feature is the ability to create completely dynamic environments that can scale up and down based on a “per scenario” basis, as required. The above figure depicts an environment which is composed of both types of components: permanent and dynamic.
Permanent components are the ones that are always present and are instantiated in a hardcoded manner. Dynamic components on the other hand, are scalable components which can be instantiated or not based on the scenario that’s being run. This chapter provide in-depth details on how all of this is possible.
To create a dynamic environment, the first step is to extend the environment provided by the “amiq_ectb_environment” class:
class amiq_dvcon_tb_env extends amiq_ectb_environment;
See amiq_ectb/tb/sv/amiq_dvcon_tb_env.svh for an usage example.
The amiq_ectb_environment base class contains functions for dynamically creating components based on external input (plusargs) and a base definition for the build phase that calls all the relevant functions in the right order:
virtual function void build_phase(uvm_phase phase);
   super.build_phase(phase);
   pre_create_objects();
   push_all_objs();
   create_objects();
   post_create_objects();
   pre_create_components();
   push_all_comps();
   create_components();
   post_create_components();
endfunction
The ECTB provides user defined hook functions, which provide flexibility in key points of the environment build phase, which is before/after the creation of objects/components:
   virtual function void pre_create_objects(); endfunction
   virtual function void post_create_objects(); endfunction
   virtual function void pre_create_components(); endfunction
   virtual function void post_create_components(); endfunction
The objects are created first, since the process can be used to create configuration objects for VIPs. The post_create_objects() function can be used to set the create objects to the config db as needed. For in-depth definitions of the push/create objects/components have a look at files: amiq_ectb/sv/amiq_ectb_obj_create_functions.svh, and amiq_ectb/sv/amiq_ectb_comp_create_functions.svh.
Once these are understood, the next step is to prepare the environment to work with a changing number of objects/components. As seen in the amiq_dvcon_tb_env.svh example, because the components/objects are dynamic, we need to create smart functions that parse the object/component queue and cast the instances to their relevant types. The code below shows an examples of such components casting:
virtual function void post_create_components();
   super.post_create_components();
   cast_agents();
   configure_agents();

   // We cannot have a working TB without a sequencer, so we create it outside
   // of the plusarg dynamic scheme
   virtual_sequencer = amiq_dvcon_tb_sqr::type_id::create("virtual_sequencer", this);
endfunction : post_create_components

function void cast_agents();
   foreach(components[i]) begin
      case(components[i].get_type_name())
         "*red_agent*": begin
            amiq_dvcon_tb_vip_red_agent proxy_agent;
            $cast(proxy_agent, components[i]);
            my_red_agents.push_back(proxy_agent);
         end
................................................
         // Keep in mind, that components which have to always exist, can be created separately
         // This serves as an example of an env that can be created without a coverage collector
         "*coverage_collector*": begin
            $cast(cov_collector, components[i]);
         end
      endcase
   end
endfunction
Because the names are an important part of utilizing the factory, the same names can be used to correlate certain types of objects to the base types. By the way, this is not a mechanism that should make you feel constrained. There are no requirements for this type of mechanics to be present whenever an object or a component is created. It is very much possible to have a hybrid environment, which has static defined objects/components as well as dynamic ones.
Below there is an example of how one can configure various agents in the environment:
function void configure_agents();
   if(my_red_agents.size()>1)
      foreach(my_red_agents[i]) begin
         amiq_dvcon_tb_vip_red_cfg_obj proxy_red_agent_cfg;
         proxy_red_agent_cfg = red_cfg(i);
         uvm_config_db#(amiq_dvcon_tb_vip_red_cfg_obj)::set(this, $sformatf("*red_agent*%0d", i), "m_config_obj", proxy_red_agent_cfg);
      end
   else if(my_red_agents.size()==1) begin
      amiq_dvcon_tb_vip_red_cfg_obj proxy_red_agent_cfg;
      proxy_red_agent_cfg = red_cfg(0);
      uvm_config_db#(amiq_dvcon_tb_vip_red_cfg_obj)::set(this, $sformatf("*red_agent*"), "m_config_obj", proxy_red_agent_cfg);
   end
................................................
endfunction : configure_agents
Function configure_agents() that is being called after cast_agents() is responsible in our example for creating the necessary configuration objects. Because a configuration object is always necessary when an agent is created, there is no reason to dynamically create the configuration objects, because their number is fixed and tied to the number of agents.
Furthermore, these configuration objects have fields that might require further constraining. If they are being extended from the class amiq_ectb_object, those fields can be controlled directly through plusargs. In this example, we assume all configuration objects are defined under pre-existing VIPs which are not based on our framework. That means that we need to have a global config object based on our framework, which assigns the relevant configuration to each VIP.
Having an object based on amiq_ectb_object brings us to our second important feature, which is dynamically defined variables. The normal workflow in UVM is that you have variables in all your relevant configuration objects, which are being set from a higher layer configuration object, which itself gets assigned with relevant values provided by the test. In our case, the test becomes a container for functionality and scenarios are completely dynamic, so these constraints from upper layer are moved outside of the simulator, in the external control layer.
function amiq_dvcon_tb_vip_red_cfg_obj red_cfg(int agent_id);
   amiq_dvcon_tb_vip_red_cfg_obj red_agent_cfg;
   red_agent_cfg = new("red_agent_cfg");
   red_agent_cfg.m_agent_id = agent_id;
   red_agent_cfg.m_checks_enable = env_cfg.red_vip_has_checks[agent_id];
   red_agent_cfg.m_coverage_enable = env_cfg.red_vip_has_coverage[agent_id];
   red_agent_cfg.m_is_active = env_cfg.red_vip_is_active[agent_id];
   return red_agent_cfg;
endfunction

function amiq_dvcon_tb_vip_blue_cfg_obj blue_cfg(int agent_id);
   amiq_dvcon_tb_vip_blue_cfg_obj blue_agent_cfg;
   blue_agent_cfg = new("blue_agent_cfg");
   blue_agent_cfg.m_agent_id = agent_id;
   blue_agent_cfg.m_checks_enable = env_cfg.blue_vip_has_checks[agent_id];
   blue_agent_cfg.m_coverage_enable = env_cfg.blue_vip_has_coverage[agent_id];
   blue_agent_cfg.m_is_active = env_cfg.blue_vip_is_active[agent_id];
   return blue_agent_cfg;
endfunction

................................................
To understand how this works, we need to have a look at amiq_ectb/sv/amiq_ectb_object.svh and amiq_ectb/sv/amiq_ectb_reg_functions.svh:
class amiq_ectb_object extends uvm_object;
   `uvm_object_utils(amiq_ectb_object)
   function new(string name="");
      super.new(name);
      register_all_vars();
   endfunction

   `include "amiq_ectb_reg_functions.svh"
endclass
In amiq_ectb_object one can notice that a new function called register_all_vars() has been added to the constructor. This function is defined inside amiq_ectb/sv/amiq_ectb_reg_functions.svh and its purpose is to interrogate the plusargs database and gather values for all the variables defined using this mechanism.
The function register_all_vars() is a hook that the user populates with calls to the *_reg() functions:
virtual function void register_all_vars();
endfunction

function int int_reg(string my_var_name, int default_value=0);
   `uvm_info(get_name(), $sformatf("Registering field"), UVM_NONE)
   my_var_name = {get_name(), "_", my_var_name};
   `uvm_info(get_name(), $sformatf("Looking for var:%s", my_var_name),UVM_NONE)
   if(!$value$plusargs({my_var_name, "=%0d"}, int_reg)) begin
      `uvm_info(get_name(), $sformatf("Didn't find the plusarg"),UVM_NONE)
      int_reg = default_value;
   end else begin
      `uvm_info(get_name(), $sformatf("Found the plusarg"),UVM_NONE)
   end
endfunction

function bit bit_reg(string my_var_name, bit default_value=0);
   `uvm_info(get_name(), $sformatf("Registering field"), UVM_NONE)
   my_var_name = {get_name(), "_", my_var_name};
   `uvm_info(get_name(), $sformatf("Looking for var:%s", my_var_name),UVM_NONE)
   if(!$value$plusargs({my_var_name, "=%0b"}, bit_reg)) begin
      `uvm_info(get_name(), $sformatf("Didn't find the plusarg"),UVM_NONE)
      bit_reg = default_value;
   end else begin
      `uvm_info(get_name(), $sformatf("Found the plusarg"),UVM_NONE)
   end
endfunction

function string string_reg(string my_var_name, string default_value="");
   `uvm_info(get_name(), $sformatf("Registering field"), UVM_NONE)
   my_var_name = {get_name(), "_", my_var_name};
   `uvm_info(get_name(), $sformatf("Looking for var:%s", my_var_name),UVM_NONE)
   if(!$value$plusargs({my_var_name, "=%0s"}, string_reg)) begin
      `uvm_info(get_name(), $sformatf("Didn't find the plusarg"),UVM_NONE)
      string_reg = default_value;
   end else begin
      `uvm_info(get_name(), $sformatf("Found the plusarg"),UVM_NONE)
   end
endfunction
These calls allow the user to set up a name for the plusargs as well as a default value, which should be used if that plusarg is not defined.
Some of the variables in the configuration object are being registered as plusargs and given the default value of UVM_ACTIVE:
virtual function void register_all_vars();

   // Active/Passive
   red_vip_is_active[0] = uvm_active_passive_enum'(bit_reg("red_vip0_is_active", UVM_ACTIVE));
   red_vip_is_active[1] = uvm_active_passive_enum'(bit_reg("red_vip1_is_active", UVM_ACTIVE));
................................................
The final plusargs, which are going to be used are composed of the class name that instantiates the variables, aggregated with the string passed as an argument to the *_reg() function.
Examples on how the plusargs are defined can be found in amiq_ectb/scripts/plusarg_gen/Verification_Environment.args and amiq_ectb/scripts/plusarg_gen/Object_definition.args.
As seen in the snippet below, an entire environment can be defined through plusargs.
+amiq_dvcon_tb_env_comp0=amiq_dvcon_tb_vip_red_agent
+amiq_dvcon_tb_env_comp0_name=red_agent
+amiq_dvcon_tb_env_comp0_no=2

+amiq_dvcon_tb_env_comp1=amiq_dvcon_tb_vip_blue_agent
+amiq_dvcon_tb_env_comp1_name=blue_agent
+amiq_dvcon_tb_env_comp1_no=1

................................................
+amiq_dvcon_tb_env_comp3=amiq_dvcon_tb_coverage_collector
+amiq_dvcon_tb_env_comp3_name=coverage_collector
+amiq_dvcon_tb_env_comp3_no=1
The syntax used for the plusargs is broken down and explained in the “Plusarg syntax” chapter of the User Guide. Any number of components can be defined using the syntax, as well as any number of each, together with custom names for each of them. Also, the number of each component and the name can be omitted, the framework being able to automatically add those, using the type name as name and creating only one instance of said component. Furthermore, if the register_all_vars() function is defined and relevant variables are added to it, all variables can be controlled as well.
In snippet below, the env_cfg shown earlier is instantiated under the env dynamically and it has some variables set to a particular value.
+amiq_dvcon_tb_env_obj0=amiq_dvcon_tb_env_cfg
+amiq_dvcon_tb_env_obj0_name=env_cfg_0
+env_cfg_0_vip0_is_active=1
+env_cfg_0_vip0_has_has_coverage=1
................................................
Same as for the components, the syntax for the plusargs is explained in the Plusarg syntax chapter.
Sequence scheduling / Scenario creation
Sequence scheduling is probably the most distinct feature of this framework. We no longer think of testcases and scenarios being the same thing. Within our framework, we only have a singular testcase, which creates the environment and facilitates the creation of scenarios.
Scenarios are now untied to the code and exist as a virtual component, which is provided at runtime to the simulator using a distinct collection of plusargs. To understand how this is possible, we have to have a look at the base test, “amiq_ectb_test”, a class that has to be extended to unlock these features.
class amiq_ectb_test extends uvm_test;
   // Sequence types
   string sequence_types[$];
   // Sequence names
   string sequence_names[$];
   // Sequence serial/parallel
   bit sequence_parallel[$];
   // Virtual sequencer
   uvm_sequencer virtual_sequencer;
   // Used to create components
   // Needs to be retrieved so it is instantiated globally to reduce performance hit
   uvm_factory factory;
As shown above, the test instantiates the primary queues, which hold the relevant fields necessary to create a scenario:
- The type of the sequences that are going to be run
- Their names, which assure their unicity (it is recommended to use a unique name)
- Boolean flag to indicate if the sequence is going to be run in the background (parallel mode) or not
Being queues, any number of sequences can be defined to create a scenario. A virtual sequencer, which has to be populated, is present as well. All sequences will start on that sequencer. Casting it in the body of the sequence will offer you access to all handles inside the sequencer. (That’s how relevant VIP sequencers can be accessed)
task run_phase(uvm_phase phase);
   super.run_phase(phase);

   if(virtual_sequencer==null) `uvm_fatal(get_name(), $sformatf("A virtual sequence has to be set in the test on which all defined virtual sequences will be started."))

   // Retrieve the factory globally so it is available in all functions without having to "get" it multiple times
   factory = uvm_factory::get();

   // Read the plusargs for all the defined sequences and save their type together with the name and parallelism status, if defined
   retrieve_all_seq_type();

   // Based on the previous returned types, names and parallelism status create and start all sequences
   for(int i=0; i < sequence_types.size(); i++) begin
      schedule_sequence(i);
      wait_threads(i);
   end
endtask : run_phase

/**
 * @param index - Current index parsed in the type/name/parallel queues
 */
task wait_threads(int index);
   if(sequence_parallel[index] && ~sequence_parallel[index+1])
   wait fork;
endtask : wait_threads
In the code snippet above the “run_phase()” can be visible. The most important functions being called inside the “run_phase()” are “retrieve_all_seq_type()” and “schedule_sequence()”.
“Retrieve_all_seq_type()” is the function that interrogates all the plusargs and populates the queues that are present in the test base class.
function string retrieve_seq_type(int index);
   string seq_index = $sformatf("seq%0d", index);
   if(!$value$plusargs({seq_index, "=%0s"}, retrieve_seq_type)) retrieve_seq_type = "";
endfunction

function string retrieve_seq_name(int index);
   string seq_index = $sformatf("seq%0d_name", index);
   if(!$value$plusargs({seq_index, "=%0s"}, retrieve_seq_name)) retrieve_seq_name = "";
endfunction

function bit retrieve_seq_if_parallel(int index);
   string seq_index = $sformatf("seq%0d_p", index);
   if(!$value$plusargs({seq_index, "=%0b"}, retrieve_seq_if_parallel)) retrieve_seq_if_parallel = 0;
endfunction
The above functions are what enables the "retrieve_all_seq_type()" function to gather all the relevant data.
function void retrieve_all_seq_type();
   string seq_type;
   string seq_name;
   bit seq_parallel;
   int index;

   forever begin
      // Retrieve the sequences passed as plusargs
      seq_type = retrieve_seq_type(index);
      // If no sequence name is retrieved, we break the loop
      if(seq_type == "") break;

      // If the sequence exists, retrieve its name, if that is defined
      seq_name = retrieve_seq_name(index);

      // If the name is not defined, create it based on the type and the index
      if(seq_name=="") seq_name = $sformatf("%0s_%0d", seq_type, index);

      // If the parallelism status is defined, retrieve it, otherwise it is serial
      seq_parallel = retrieve_seq_if_parallel(index);

      // Push the type, name and parallelism status
      sequence_types.push_back(seq_type);
      sequence_names.push_back(seq_name);
      sequence_parallel.push_back(seq_parallel);

      index++;
   end
endfunction
The user is responsible to make sure that all types are defined correctly. The name and parallelism can be omitted, as the name will always be unique and the parallelism will be considered as serial.
task create_and_start_seq(string type_name, string inst_name, int index);
   uvm_object m_object;
   amiq_ectb_sequence m_sequence;

   // Create
   m_object = factory.create_object_by_name(type_name, this.get_full_name(), inst_name);
   $cast(m_sequence, m_object);

   // If seq for this index is defined but the type is not defined, we throw a warning and continue to next index
   if(m_sequence == null) begin
      `uvm_fatal(get_name(), $sformatf("seq%0d is defined as a type that doesn't exist. Type defined: %0s", index, type_name))
   end

   // Register_all_vars
   m_sequence.register_all_vars();

   // Set the pointer to env and start sequence
   m_sequence.start(virtual_sequencer);

endtask
The “create_and_start_seq()” is responsible for creating all the sequences using the factory and start the sequence. The parallelism is handled through the wait_threads() function that will block the execution if the next sequence is marked as serial -> If the current sequence and the next one are parallel, the wait_thread won’t wait. This will be repeated until the next sequence is serial, allowing any number of parallel sequences to be scheduled at once.
A fully working extension/example of the amiq_ectb_test can be seen at “/amiq_ectb/tb/tc/amiq_dvcon_tb_tc.svh”.
virtual function void register_all_vars();
   super.register_all_vars();
   red_pkt_nr = int_reg("red_pkt_nr");
   red_agent_id = int_reg("red_agent_id");
................................................
endfunction : register_all_vars
Same as for the components and objects in the environment, the sequences have the “register_all_vars()” function that allows the fields of the sequence to be set to relevant values based on the scenario, which needs to be ran. An example of a sequence can be seen in “/amiq_ectb/tb/sv/seq_lib/amiq_dvcon_tb_seq0.svh”
red_pkt_nr 		= int_reg("red_pkt_nr", 10000);
red_agent_id 	= int_reg("red_agent_id", 0);

red_field0_constraints = amiq_dvcon_tb_dynamic_constraint::type_id::create($sformatf("red_field0_constraints"));
................................................
red_field0_constraints.register_all_vars();
................................................
For the purpose of automation when it comes to coverage closure and stimuli constraint optimization, we need a variable amount of constraint intervals. For this purpose, we have created a dynamic constraint object, which can be reviewed at “/amiq_ectb/tb/sv/seq_lib/amiq_dvcon_tb_dynamic_constraint.svh”. This object allows us to create an indefinite amount of intervals for item constraint randomization.
+seq0=amiq_dvcon_tb_seq0
+seq0_name=amiq_dvcon_tb_seq0_0

+seq1=amiq_dvcon_tb_seq0
+seq1_name=amiq_dvcon_tb_seq0_1
+seq1_p=1
+amiq_dvcon_tb_seq0_1_blue_pkt_nr=3000

+seq2=amiq_dvcon_tb_seq0
+seq2_name=amiq_dvcon_tb_seq0_2
+seq2_p=1
A simple scenario created with the same type of sequence and three different instances can be seen in the figure above. In this case, for the most part, the default field values are being used with an overwrite shown for “blue_pkt_nr” in the sequence “amiq_dvcon_tb_seq0_1”.
class amiq_dvcon_tb_dynamic_constraint extends amiq_ectb_object;
   `uvm_object_utils(amiq_dvcon_tb_dynamic_constraint)

   int nof_intervals;
   int range_start[];
   int range_end[];
   int range_weight[];

   localparam int max_int = 2**31-1;

   // new - constructor
   function new(string name = "amiq_dvcon_tb_dynamic_constraint");
      super.new(name);
   endfunction : new

   virtual function void register_all_vars();
      super.register_all_vars();
      nof_intervals = int_reg("nof_intervals", 10);

      range_start = new[nof_intervals];
      range_end = new[nof_intervals];
      range_weight = new[nof_intervals];

      foreach(range_start[i])
         range_start[i] = int_reg($sformatf("range_start_%0d", i),  i * (max_int / nof_intervals));
      foreach(range_end[i])
         range_end[i] = int_reg($sformatf("range_end_%0d", i),  (i + 1) * (max_int / nof_intervals)  -1);
      foreach(range_weight[i])
         range_weight[i] = int_reg($sformatf("range_weight_%0d", i), (100 / nof_intervals));

   endfunction : register_all_vars
endclass : amiq_dvcon_tb_dynamic_constraint
Visible in the code above is the registration of the dynamic intervals in the dynamic_constraint class. The name of the classes shown two code blocks ago are required to register these plusargs. Any number of intervals can be defined by adding plusargs for +*name_of_the_dynamic_constraint_object*_range_*_*index*=*value*.
+seq0=amiq_dvcon_tb_seq0
+amiq_dvcon_tb_seq0_0_red_pkt_nr=10
+red_field0_constraints_nof_intervals=100
+red_field1_constraints_nof_intervals=100
+red_field2_constraints_nof_intervals=100

+red_field0_constraints_range_start_98=2147483645
+red_field0_constraints_range_end_98=2147483645
+red_field0_constraints_range_weight_98=9993
+red_field0_constraints_range_start_95=2147483642
+red_field0_constraints_range_end_95=2147483642
+red_field0_constraints_range_weight_95=9995
+red_field0_constraints_range_start_3=3
+red_field0_constraints_range_end_3=3
+red_field0_constraints_range_weight_3=9997
+red_field0_constraints_range_start_97=2147483644
+red_field0_constraints_range_end_97=2147483644
+red_field0_constraints_range_weight_97=9997
+red_field0_constraints_range_start_0=0
+red_field0_constraints_range_end_0=0
+red_field0_constraints_range_weight_0=9999
+red_field0_constraints_range_start_2=2
+red_field0_constraints_range_end_2=2
+red_field0_constraints_range_weight_2=9999
+red_field0_constraints_range_start_4=4
+red_field0_constraints_range_end_4=4
+red_field0_constraints_range_weight_4=9999
+red_field0_constraints_range_start_96=2147483643
+red_field0_constraints_range_end_96=2147483643
+red_field0_constraints_range_weight_96=9999
In the code snippet above a scenario based on a single sequence of type “amiq_dvcon_tb_seq0” with default name of “amiq_dvcon_tb_seq0_0” and default parallelism of “serial” is created. Separate from the sequence, the fields of the constraint object instantiated under that sequence are set to 100 intervals and each interval has a start/end value assigned for the interval, as well as a weight. How this can be used for verification ca be seen in the “Coverage Driven Constraint Adjustment” chapter, where the intervals are automatically generated based on previous regressions results.
Example of automation
Excel to plusargs converter
Using this framework, the entire testbench configuration and stimuli constraints will be described by large files containing hundreds, if not more plusargs. A different solution is required for storing and managing plusargs in a more human-readable format.
Our proposed solution is to organize the testbench and stimuli descriptions in one or more excel sheets, and then use a script(generate_plusargs.py) to generate the plusarg files from there. There are three different types of tables that are used:
1. Component description
To add a new component to the environment, the user needs to specify only the type of the component and the location where to instantiate it. Optionally, the user can control the name of the component and how many instances of that particular type are created.

Figure 2. Excel sheet defining components
The excel sheet from picture above will be converted to the first plusargs shown as example in the Dynamic Environment chapter.
2. Object description
An object can be added in any component that extends amiq_ectb_component or amiq_ectb_environment. To be able to generate the plusargs, the table definition in the picture below is required. On the first row, the user defines where the object is instantiated, what type it is and the name with which it will be created. On the next rows, the user will list the fields from the object that will be updated.

Figure 3. Excel sheet defining objects
3. Sequence description
A sequence is defined similarly to an object, the differences are that the parent is not specified in the table, as all sequences are created in the test, and that there is an extra “Run in parallel” column, to be able to define how the sequences will be started (more details in Sequence scheduling / Scenario creation section).
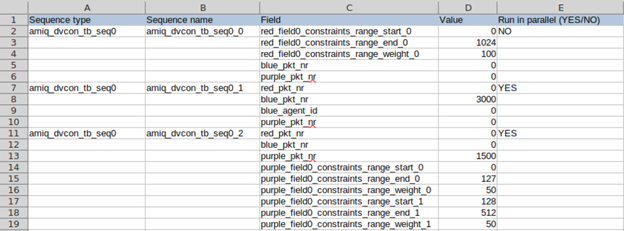
Figure 4. Excel sheet defining sequences
The generate_plusargs.py script can receive multiple .xlsx files as input, each of them having multiple sheets used to describe testbench elements (components/objects/sequences). The script will output a plusarg file for each sheet with the naming convention
Excel example: scripts/plusarg_gen/tb_params.xlsx
Run example: python3.6 generate_plusargs.py tb_params.xlsx
Post-session script - coverage driven constraint adjustments
One of the main benefits of using the ectb framework is that the plusargs represent a set of clearly defined parameters, which can control the behavior of the testbench. Updating these parameters would allow the test environment to stimulate the DUT in various ways, from randomly exploring and bug-hunting to targeting specific scenarios.
The post-session script developed for the example TB has the goal to automatically fill-up the coverage based on the results from previous regressions. The flow described in Figure 5 has the following steps:
- Run a regression
- Interrogate the database using Coverage Lens and create a local coverage database in JSON format
- Merge the JSON with the previous coverage results
- Check the end condition
- If a certain number of regressions have been run or the coverage goal has been hit then we are done
- Otherwise generate a new set of plusargs
- Start a new regression with the newly generated parameters.
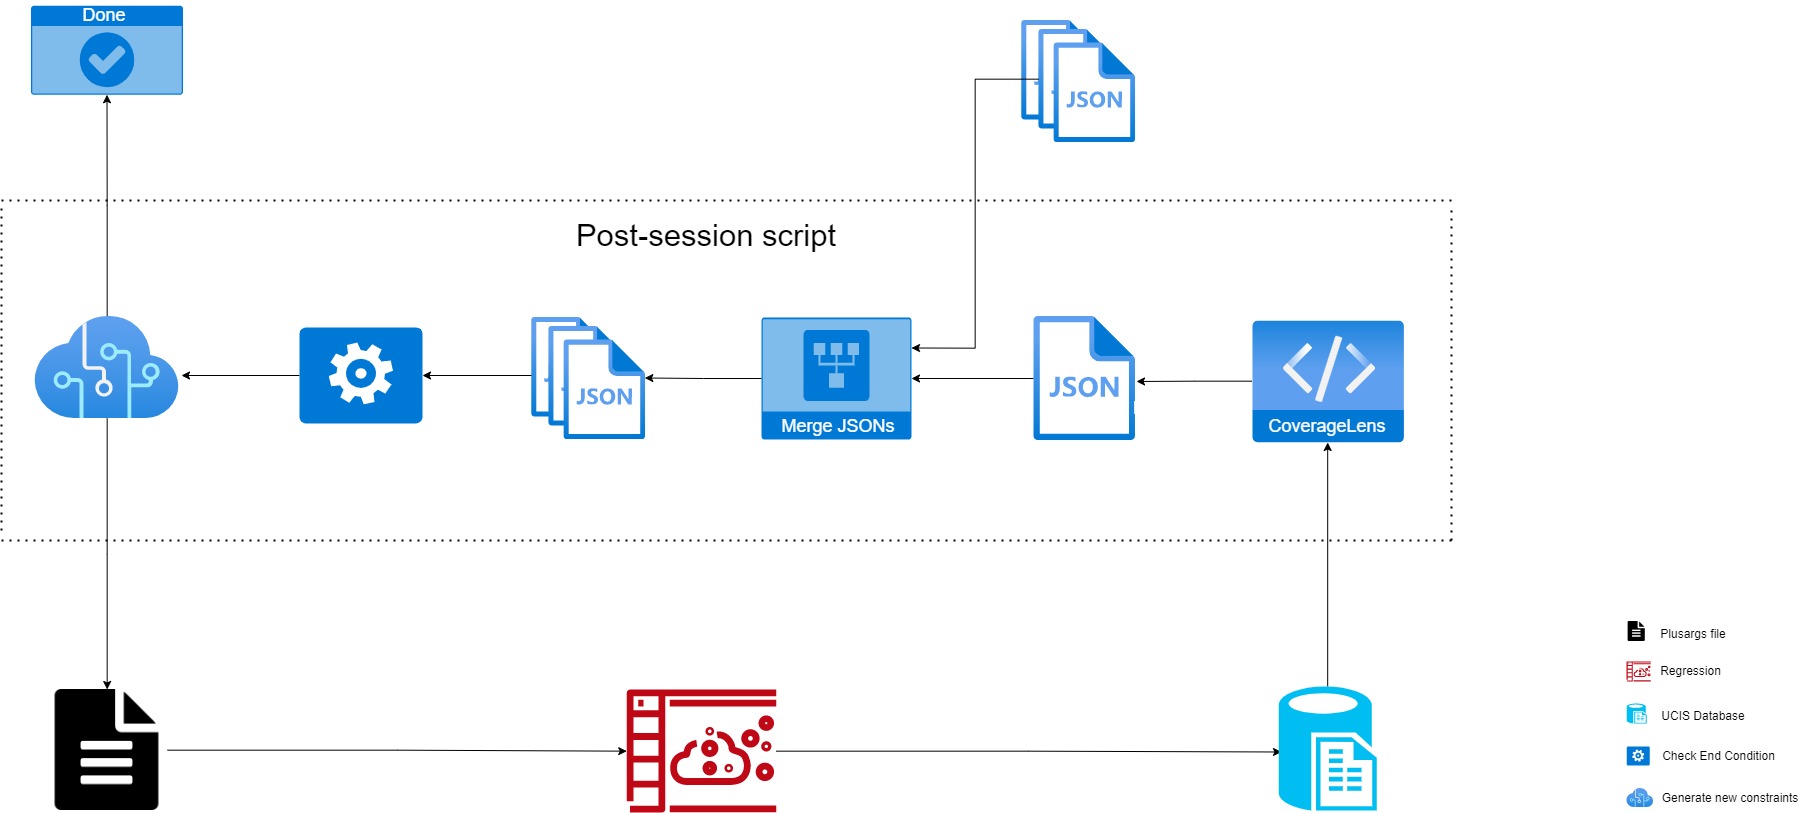
Figure 5. Coverage feedback flow
To be able to take advantage of this flow, the user needs to update two files in "scripts/post_session":
- post_session.config -> from here the post_session.py is taking external parameters such as maximum number of runs, path to .vsif, path to store coverage database,etc
- update_parameters.py -> In post_session.py we call update_seq_parameters(coverage_db) which should be implemented by the user. This function will contain the algorithm that translates the merged coverage results provided by the post-session script, to new stimuli (new plusarg files)
Plusarg syntax
As mentioned in the previous sections, one of the most important features of this framework is the ability to create a dynamic environment, through the use of plusargs. The syntax to instantiate any component or object inside an ectb_component is:
- parent_component_name_comp#idx=new_component_type
- parent_component_name_obj#idx=new_object_type
It is important to note that the indexes for either component or object should always be in ascending order starting with 0.
By default a component/object instantiated via the ectb infrastructure, will have the class type set to the name field. The name can be customized by using the “_name” postfix for the plusarg, i.e.
- parent_component_name_comp#idx_name=comp_name
- parent_component_name_obj#idx_name=obj_name
A feature unique to ectb components is that there is the option to instantiate an array of components using the “_no” postfix. Each component will be created with a unique name, indexed from 0 to #nof_comp-1
- parent_component_comp#idx_no=#nof_comp
Sequences are a particular case of ectb_objects. To start and run a sequence, there is no need to specify the parent component, as all sequences are created in the test, only the sequence type and name:
- seq#idx=sequence_type
- seq#idx_name=sequence_name
All sequences will be started in the order of declaration, the user has the option to decide if the execution flow is serial or in parallel. The “_p” is used to signal that a sequence should be started in the background (in parallel with the next sequence).
- seq#idx_p = <1/0>
The default value of any variable registered with ectb can be updated using plusargs. A field can be identified by using the name of the container (component/sequence/object) and the name of the field as such:
- name_of_container_field_name=value
To uniquely identify a field in a particular container, it is important to have unique names for all the components/objects/sequences. If this is not the case, one plusarg definition will update the fields in all the containers with the same name.
Conclusions and future work
For the work that we have done so far, we can confirm that the framework, even in its actual early stage serves the purpose of providing an external control layer for an SV/UVM environment. This is important because it exposes the TB to any external tools or scripts that the user can acquire or create. By these means, a new stage of automation can be reached.
- The control layer of the TB can be formatted in such a way that it is easy to understand and review by people not directly involved in development.
- New scenarios can be created by utilizing existing blocks like components and sequences, which can be documented, without having to modify the code.
- A separation can be established between functionality and scenario development which allows different engineers with different expertise to focus on the areas of interest.
- The collection of arguments recorded in the external control layer can be used as a high level debug mechanism when it comes to regression analysis.
- New methods of coverage optimization can be achieved by having tools and scripts, which can analyze regression results and produce new inputs to the control layer.
Our focus in the near future is to provide even more examples of usage as well as refining our implementation, together with new scripts, which can automate other parts of verification.