Introduction
Deep Learning has taken the world by storm and now has applications in almost every field, from image and speech recognition to medical software, from data analysis to the fine arts. Even though the idea of Deep Learning is not new and the basic principle is pretty straightforward, only recently has it grown in popularity thanks to the use of high performance CPUs and GPUs in the training process.
In this blog post I talk about how to implement a Deep Learning algorithm for handwritten digit recognition by taking advantage of the power of parallel computing inside an FPGA fabric and speeding up the development process using High Level Synthesis (HLS).
Workflow overview
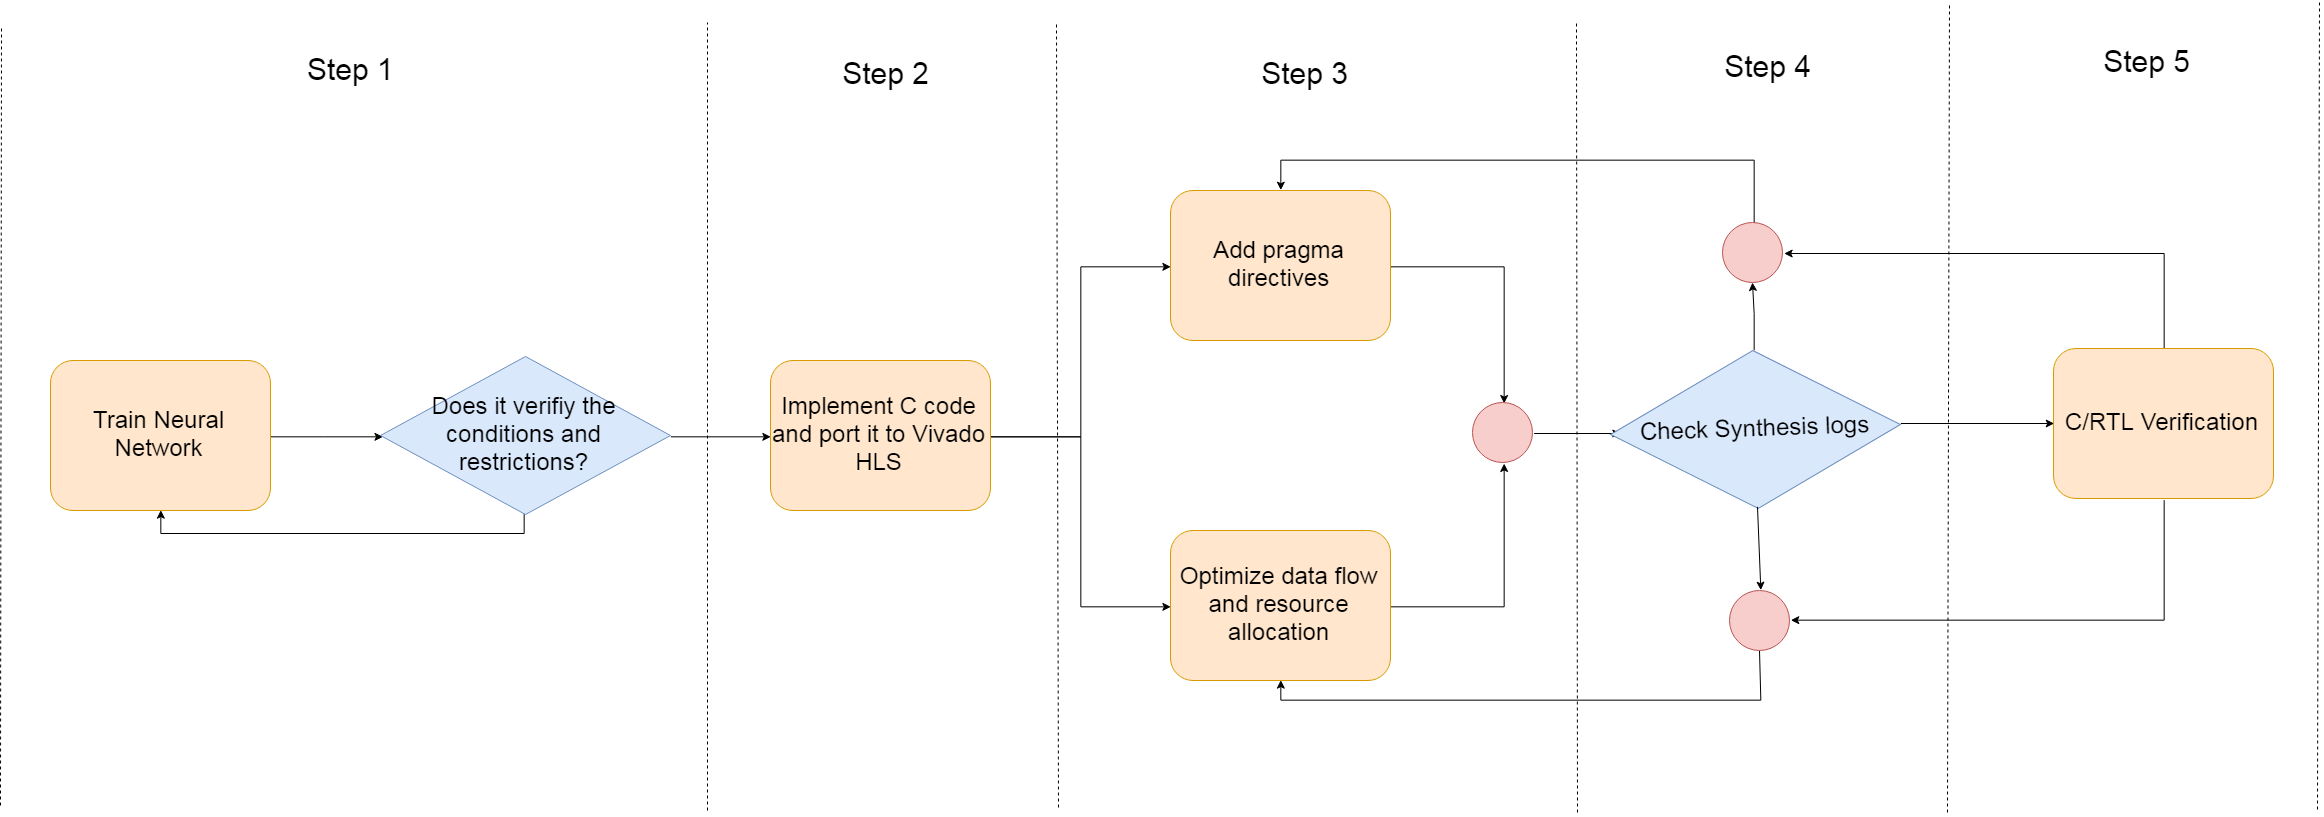
Figure 1: Workflow overview
Step 1: Choosing a Neural Network architecture
First I explored a few different neural network architectures and chose one that was best suited to the task at hand by satisfying a set of performance criteria and design restrictions.
I recommend using Python for training the neural network because there are lots of resources available online: from APIs (TensorFlow, Caffe, Keras, etc.) to the wider community that shares insights via blogs, forums, and various tutorials. Training takes a lot of time and another advantage of using python is that you have access to a number of cloud computing services to speed things up like FloydHub, Amazon Web Services and the Intel AI Academy. Other languages could be used for training, e.g. Matlab or even C, but I think Python has more features that help speed up the training process.
The first thing to do is to define the metrics that are going to be used to evaluate different neural network architectures. In my exploration I used the following selection criteria:
- Accuracy
- Parameter count
- Parallelization potential
I explored two main training techniques for this task:
- Extreme Machine Learning (EML)
- Backpropagation (backprop)
EML is a technique that has proven to have a high accuracy on the Modified National Institute of Standards and Technology data set widely known as MNIST (for all training I used the MNIST dataset because of its robustness), but its neural architecture is similar to a feedforward neural network which comes with a high parameter count and low parallelization potential. Feedforward neural network require all the values from the previous layer to be known in order to start computing the next layer. This leaves little room for improvement using HLS.
Backpropagation is widely used to train Feedforward Neural Networks and multiple variations of Convolutional Neural Networks (CNN). I trained multiple variations of NNs and even a Multi-Column CNN (MC-CNN). As expected the MC-CNN had the best accuracy on the MNIST dataset.
Each neural network has a set of parameters (weights), which are trained, and hyperparameters, which are more or less empirically chosen.
Some of the hyperparameters have a direct influence on the Neural Network structure:
- Number of convolutional layers
- Number of fully connected (FC) layers
- Number of units (neurons) in each FC layer
- Kernel size, stride, padding
- Number of kernels
- Number of columns (only for MC-CNN)
- Activation function
Other hyperparameters only affect the training process:
- Dropout
- Mini-batch training, size of mini-batch
- Learning rate
- Minimization algorithm
I ended up choosing a regular CNN because of the low parameter count (Table 1 – highlighted in green)
| Neural Network | Parameter count |
|---|---|
| Extreme Machine learning algorithms | >1,000,000 |
| Fully Connected Networks | 100,000-12,000,000 |
| Convolutional Neural Networks | 5,000-1,000,000 |
| Multi-Column CNNs | Number of columns * CNN parameters |
Table 1: Parameter count for each type of neural network
To obtain the final architecture I trained 194 models covering a range of hyperparameters, as seen in Table 2. The training of the 194 models took a total of 29 hours and 17 minutes using an nVidia Tesla GPU.
| Hyperparameter | Range | Observations |
|---|---|---|
| Number of convolutional layers | [2:10] | |
| Number of fully connected layers | [1:5] | |
| Number of units (neurons) in each FC layer | [20:500] | |
| Kernel size | {2,3,5,7} | Anything higher than 7 will decrease the size of the resulting map too fast. |
| Padding | Never | I wanted to decrease the number of parameters after each convolution. |
| Stride | 1 for convolutions and 2 for pooling | Used a constant small stride to slowly decrease the feature map size after each convolution or pooling. |
| Number of kernels | [5:50] | After 20 the performance was saturated, after 35 the performance started to decrease. |
| Activation function | Sigmoid tanh ReLU |
ReLU: was chosen because it speeds up the training and prevents training saturation. |
| Dropout | {0%, 40-80%} | Ended up not using dropout at all. |
| Mini-batch training, size of mini-batch | {2,4,8,16, …1024} | Best performance was obtain using a 64 size minibatch. |
| Learning rate | [0.001: 0.1] | Best performance was obtained using 0.01. |
| Minimization algorithm | Gradient Descent RMSprop Adam |
As expected Adam provided the best results. |
Table 2: Hyperparameters

Figure 2: 10xCONV7-POOL2-20xCONV7-POOL2- 84-10
The accuracy of all the trained networks was above 90%; the minimum requirement was to have an accuracy of 98.5% with the goal being to hit 99%. In the end a trade-off was made, choosing an architecture with a low parameter count to be able to have more resources available on the FPGA for parallelization.
| Arhitecture | Number of parameters | Accuracy |
|---|---|---|
| 10xCONV7-POOL2-20xCONV7-POOL2-84-10 | 17430 | 98.93 |
| 6xCONV7-POOL2-16xCONV7-POOL2-92-10 | 14014 | 98.57 |
| 6xConv5-POOL2-24xCONV3-POOL2-12xCONV3-POOL2-84-10 | 5346 | 98.25 |
Table 3: Three promising architectures from which I chose the one highlighted in green.
Step 2: Implementation of the Neural Network in C
To be able to deploy the neural network algorithm on an FPGA, the algorithm needs to be written in a Hardware Description Language. For this reason I had to manually rewrite the entire inference step of the neural network in C/C++. To ensure that the newly implemented C code worked fine, it was tested against the Python inference using the same trained weights.
Step 3: Adding High Level Synthesis specific constructs
HLS comes with a number of #pragma directives that allow the user to guide the HLS compiler as to how to generate the desired design. It also contains a number of libraries containing predefined data types and functions that can boost the performance of your design.
HLS constructs help improve the design, but are not necessary to obtain a synthesizable code. The initial synthesis results were bad, but the design could be implemented on a big enough FPGA. In this project the synthesis is targeting a Zynq XC7Z020 System on a Chip.
| BRAM | DSP | FF | LUT | Clock period (ns) | Latency (cc) | |
|---|---|---|---|---|---|---|
| Values | 294 | 15 | 3,311 | 6,936 | 8.43 | 3,240,373 |
| Percentage | 105% | 6% | 3% | 13% | – | – |
Table 4: Initial synthesis results
Table 3 shows the synthesis results of the C code implemented during Step 2. In this case, the BRAM count is high and the latency is poor. Fortunately, after using specific HLS constructs, the results improved significantly, as we will see in the following sections.
3.1 Fixed point arithmetics
The initial C/C++ code uses the float data type for parameters, which comes at a great cost. Fixed point operations are less precise, use less hardware and won’t affect the global accuracy of the Neural Network.
#include "ap_fixed.h"
typedef ap_fixed<WIDTH, INT_WIDTH> fixed_p;
The current algorithm can use as few as 4 bits for the fixed point data type with a small decrease in accuracy, but a significant gain in available hardware.
Table 4 shows the hardware requirements for fixed and floating point operations. When synthesized, a single multiplier operation can use up to 858 FF using a 32 bit floating point data type (float). Fixed point arithmetics uses significantly fewer resources for basic operations, e.g. addition (32 LUT and 32 FF for a fixed point adder), while the addition operation in floating point arithmetics can use up to 430 LUT and 749 FF. The final synthesized CNN uses both dedicated DSP blocks and LUT/FF-based multipliers/adders.
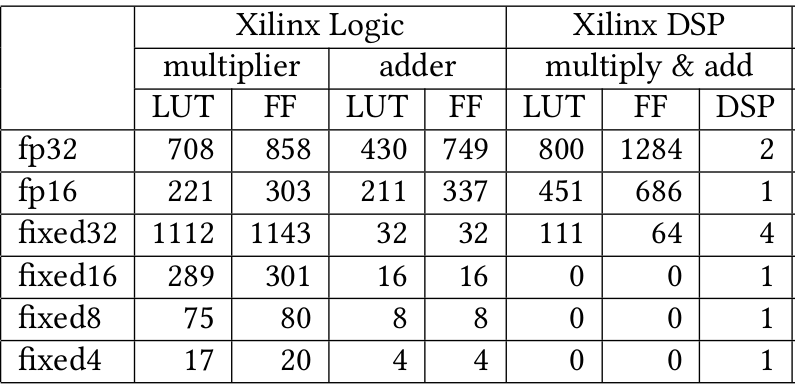
Table 5: source – A Survey of FPGA Based Neural Network Accelerator
3.2 Loop unrolling and loop pipelining
Both these actions are performed by a specific #pragma directive applied on a loop.
- #pragma HLS unroll factor=N
- #pragma HLS pipeline
Unrolling a loop basically copies the loop body N times. If a factor is equal to the number of iterations, the loop is fully unrolled. Each instance of the loop body is executed in parallel, which speeds up the design significantly.
The pipeline directive adds a pipeline register for each loop input, which initially increases the propagation delay, but in time provides an increase in throughput.
While both of these directives can improve overall design latency, they come at a cost, e.g. they increase the area of the design. Thus, you need to make a trade-off between hardware consumption and overall design latency.
3.3 Dataflow pipelining
The previous sections looked at how any C/C++ code can be optimized for FPGA deployment. In my workflow, I used three main functions, as previously stated: conv(), pool() and fc(). Even though each function is heavily parallelized at the loop level, the functions are called sequentially.
One of the main reasons I chose to use CNN is that you do not need all the data from the previous layer to start computing the output response for the current layer. This trait of the CNN allows me to further improve the throughput, by parallelizing the execution of convolutional and pooling layers. The initial C/C++ code implementation did not support the dataflow pragma directive. To make the code compatible with the dataflow pragma, some modifications had to be made:
- data streams were added between the functions
- data buffers were added in each layer

Figure 3: Dataflow pipelining
The data buffers are dimensioned in such a way that they can hold enough data to process one output for the next layer. After the output is computed, one element exits the buffer while another one enters and is used to compute the next output.
As a result, all the convolutional and pooling layers will finish at almost the same time. Unfortunately, the fully connected layers are not able to benefit from this optimization because they are executed sequentially: they need all the data from the previous layer to compute the output. This is not a reason for concern because less than 1% of the computation takes place in the fully connected layers.
Step 4: Synthesis
In HLS the term synthesis means converting the C code into Verilog or VHDL. At the end of a successful synthesis process you will end up with RTL folders containing Verilog and VHDL code and a synthesis log containing information about area, latency and clock frequency. The design needs to be tweaked until the desired hardware performance is achieved.
After implementing all the upgrades mentioned in step 3, the report looked fantastic compared with the first iteration. The number of CC dropped from 3,240,373 down to 70,754 with a small area consumption.
| BRAM | DSP | FF | LUT | Clock period (ns) | Latency (cc) | |
|---|---|---|---|---|---|---|
| Values | 96 | 161 | 13.278 | 24.276 | 13.91 | 70.754 |
| Percentage | 34% | 73% | 12% | 46% | – | – |
Table 6: Final synthesis results
Step 5: Validate synthesis results (C/RTL co-simulation)
In this step, the C code becomes a “golden model” against which the generated RTL is tested. A C testbench is used to generate and check the stimuli. If the test passes, your design is good to go!
Conclusions
The field of Deep Learning and FPGA programming is growing rapidly thanks to numerous research papers and community-driven projects. New platforms are emerging while others are becoming extinct – e.g. CPUs were the main training processor ten years ago, but now they are rarely used.
There are still improvements to be made. High Level Synthesis is still a relatively new technique in the field of FPGA programming. Also, most implementations are for the forward propagation part of the neural network, even though backpropagation algorithms can also benefit from running on an FPGA-based platform.
In the future, I plan to explore new neural network topologies more suited to FPGA implementations, such as Reduced Precision Neural Networks or Quantized Neural Networks which use low-precision arithmetics in order to reduce the hardware consumption of basic operations and the size of weight storage.
Acknowledgment
The content of this article is part of my diploma thesis and it has been developed under the umbrella of AMIQ Education Program.
Roadmap
The source code for this thesis was last modified on June 2018. During the summer of 2019, I’m planning to allocate some time for reviewing the code. After the review is done, I will make the code available on AMIQ’s Github.
Update 4th of March 2020
Here is the promised code.
And here is a short article announcing the release of the code.
46 Responses
Hello, Do you have the code you used?
Hello Jose,
I am working on cleaning up the sources. I will let you know as soon as I will make them public.
Regards,
Sergiu
Hi Jose,
I know this was a long wait, but I have managed to upload the code. If you are still interested you can read the release notes here: https://www.consulting.amiq.com/2020/03/05/cnn-using-hls/
Regards,
Sergiu
Hello, great article!
It would really help if you could provide your code as a reference.
Hello Jennifer.
Thank you for your kind words. I am planning to allocate some time this summer to clean-up the code and make it public on AMIQ’s github. Please check the Roadmap section for link.
Regards,
Sergiu
Hi Jennifer,
I know this was a long wait, but I have managed to upload the code. If you are still interested you can read the release notes here: https://www.consulting.amiq.com/2020/03/05/cnn-using-hls/
Regards,
Sergiu
Hey,
It’s a very nice talk.
Is the code available somewhere?
Hello Sean,
I have not got around to do a proper clean-up, but I am planning to allocate some time for this during the summer and then make the code public on AMIQ’s github. Please check the Roadmap section for link.
Regards,
Sergiu
Hi Sean,
As promised, I have managed to upload the code. If you are still interested you can read the release notes here: https://www.consulting.amiq.com/2020/03/05/cnn-using-hls/
Regards,
Sergiu
Hey,
It’s a nice work. I am wokring about the alexnet on the zynq7020 now. And I want to implement it with HLS.
Will you put your code on the github?
Hi Xiabo,
If you are still interested you can read the release notes here: https://www.consulting.amiq.com/2020/03/05/cnn-using-hls/.
Good luck with your Alexnet implementation:)
Regards,
Sergiu
Hello Sergiu,
Thank you for sharing your useful work. It would be really helpful if you could also share the code on Github.
Regards,
Athena
Hi Athena,
Than you for your kind words. If you are still interested you can read the release notes here: https://www.consulting.amiq.com/2020/03/05/cnn-using-hls/
Regards,
Sergiu
I think,as a promise, he will never put it his work on Github.The reasons are many. His work may be a fancy story,which never happened .Perhaps he took the pains to finish this work so it will not be easy to publish for free.More simply, this is a business that wants to make some profit ,so why not contact them to lend you their talents .
Hi Meedo,
You are partially right. It is indeed a lot of effort put into this project and indeed we are a company that must provide services to its customers in order to continue. So in that respect it was hard to find the time to finalize this article and upload the code to Github.
Buuut, here it comes: Sergiu finally uploaded the code to Github. See here: https://www.consulting.amiq.com/2020/03/05/cnn-using-hls/
Thank you for reading our blog and sharing your thoughts with us.
Sorry, but I do not see the “buffer.h” this file in your source code.
Hi Chang,
Indeed I have missed a file in that project. I have added it and now and it is on github. You can pull the latest version of the repo,
Thank you for pointing this out!
Sergiu
Hi, when I want to run C synthesis. It has error:
WARNING: [HLS 200-40] CNN-using-HLS/modules/conv/conv.cpp:23:10: fatal error: 'headers/buffer.h' file not found#include "headers/buffer.h"
^
1 error generated.
C preprocessor failed.
while executing
"source C:/Users/Aaron/Desktop/nnet_project/solution1/csynth.tcl"
invoked from within
"hls::main C:/Users/Aaron/Desktop/nnet_project/solution1/csynth.tcl"
("uplevel" body line 1)
invoked from within
"uplevel 1 hls::main {*}$args"
(procedure "hls_proc" line 5)
invoked from within
"hls_proc $argv"
Any suggestion??????
Hi Chang,
same problem occur to me even with the latest version of repo, my HLS version is 2019.2 and I’m using windows10.
Do you solve the problem in the end? If you did could you give me some help?
Thanks
Hi Chang,
This error should be fixed by the latest version of the repo. Please pull it and try it out.
Regards,
Sergiu
Hello
Can you share converted verilog code for this design?
Hello Sergiu
Very nice article. Can you please share converted verilog code for this?
Hi Samyuktha,
I do not see any reason to add the converted Verilog code to the git repo. It can generate running the csynth tcl command or from the Vivado HLS GUI.
Regards,
Sergiu
Dear Sergiu,
I try to reproduce your source code in Vivado HLS today. But when I run c/RTL cosimulation, it occurs some errors. As flowing below:
ERROR!!! DEADLOCK DETECTED at 943501000 ns! SIMULATION WILL BE STOPPED!
Dependence circle 1:
(1) Process: nnet.pool_layer1_U0
Channel: nnet.pool1_out_V_V_U, FULL
(2) Process: nnet.conv_layer2_U0
Deadlocked by ap_start, please disable start propagation with:
config_rtl -disable_start_propagation
…
ERROR: [COSIM 212-303] Aborting co-simulation: RTL simulation failed.
ERROR: [COSIM 212-344] Rtl simulation failed.
If you’re convenient, please tell me how to solve this problem.
Thank you very much!
Best regards,
Jim
Hi Jim,
I will look into it and come back to you with a response.
Regards,
Sergiu
Hi.
I run your program on Vivado. For test input (which is defined in weights.h as image) I get 5 as output. but when I give other images from mnist test data, I just get 3 and 5 as output for all images.
By the way I plot your test image. It does not look like 5!!!!!
Could you explain me why?
thanks
I have the same problem here! i create a test enviroment to test such as tensorflow do with 10k samples and in the end of the day i have the same issue. I started to investigate if the problem is that he don’t retraining the weights for the new ap_fixed type. In my first experiments related to the type i change the type of data to float and have the same issue. Now i start to investigate with the problem is in the implementation of the layers.
Hi,
I am cought up in multiple projects at the moment, but when I get some time, I will look more into the issues you are seeing.
The way I did my checking was that I generated some reference files from the python code. All these references can be found in CNN-using-HLS/nnet_stream/ref/
The nnet_test.cpp checks that the output of the neural network matches the output that is in CNN-using-HLS/nnet_stream/ref/fc_layer3_py.out
Regards,
Sergiu
I am also facing the same problem.
The input image looks like 3 but on simulating the largest value in FC_layer3 comes out for digit ‘5’ .
I also tried changing the python model and training and saving back the trained weights into the header file nnet_stream/headers/weights, but still the problem remains the same .
Also, the values change for simulation and cosimulation which i don’t think should happen.
If you have solved this problem somehow, i would request you to share the solution here.
Thankyou!
Hi, I am getting the same issue here, did you solve this problem? And how did you solved it?
hey, can u provide Verilog code for the hardware CNN accelerator !! it’s very helpful for me
Hi Deepak,
I do not see any reason to add the converted Verilog code to the git repo. It can be generated by running the csynth tcl command or from the Vivado HLS GUI.
Regards,
Sergiu
Hello, Sergiu Duda
Thanks a lot for sharing Code,
I am Using Vitis HLS i.e Vivado latest version (2020.2) and it is not accepting #include header file probably they might have removed it in this version .
I would be glad to know what changes should I make in regards of above mentioned header file, or which header file is included in this version in place of earlier one. Do I need to change code as well or just replace this header file with another one (supported by Vitis) .
Anticipating Favourable Response
Thanks!
Hi Pushkal,
Vitis is a different IDE than Vivado HLS, so I would expect to be some compatibility issues. We do not plan to maintain this code past Vivado HLS 2018.3.
If you have a solution for this problem, your feedback is more than welcome!
Thank you!
Regards,
Sergiu
I had the same issue, for me it was that hls_video.h is no longer supported in vitis, instead you should use the vitis vision library. Here is a link I think will be helpful https://xilinx.github.io/Vitis_Libraries/vision/2021.2/overview.html#migrating-hls-video-library-to-vitis-vision. My specific problem was with the LineBuffers.
Hope it works,
Juan
Not accepting #include in vitis (2020.2),
Hello, Sergui Duda
Thanks a lot for sharing Code,
I am using Vitis HLS i.e Vivado latest version (2020.2) and it is not accepting #include header file probably they might have removed it in this version .
I would be glad to know what changes should I make in regards of above mentioned header file, or which header file is included in this version in place of earlier one as specified in your code(#include ). Do I need to change code as well or just replace this header file with another (supported by Vitis).
Anticipating Favourable Response
Thanks!
Hi ANOOP,
Vitis is a different IDE than Vivado HLS, so I would expect to be some compatibility issues. We do not plan to maintain this code past Vivado HLS 2018.3.
If you have a solution for this problem, your feedback is more than welcome!
Thank you!
Regards,
Sergiu
Hi, Duda
Thanks for sharing the code.
However, when I want to do C synthesis of module conv, there’s a error and the error message is shown below:
ERROR: [HLS 200-103] Unexpected exception occurred: bad allocation.
Synthesis failed.
while executing
“source C:/Users/Yao/Desktop/Project/CNN-using-HLS/modules/conv/conv/solution1/csynth.tcl”
invoked from within
“hls::main C:/Users/Yao/Desktop/Project/CNN-using-HLS/modules/conv/conv/solution1/csynth.tcl”
(“uplevel” body line 1)
invoked from within
“uplevel 1 hls::main {*}$args”
(procedure “hls_proc” line 5)
invoked from within
“hls_proc $argv”
my HLS is 2019.2 and I’m using windows10.
I’d be really appreciated if you could give me any help or advice.
Thanks
Hello, Sergiu Duda,
Thanks for sharing the code. But I think something is wrong with the logic or indexing.
I am not getting the expected results even from the first convolution layer. I can attach my project if required.
I made only one difference in the code i.e instead of including weights as weights.h file, I added those variables directly into the main file.
Can you / others who have used the code to provide their inference for the same. I used Vivado HLS 2018.3 on windows.
Can someone explain how to go about implementing his code.I am a beginner in HLS Vivado.
Thank you very much for the topic.
I have a question about what is the data in the “ref” file if you don’t mind
Hi Omar,
The ref files contain the outputs of each layer of the CNN. These values were extracted running the forward-propagation step of the python training code [1]. The image used as an input is in the weights.h file [2]
[1] https://github.com/amiq-consulting/CNN-using-HLS/blob/master/py/get_params.py
[2] https://github.com/amiq-consulting/CNN-using-HLS/blob/master/nnet_stream/headers/weights.h
Regards.
Sergiu
Thank you very much for the reply. I have another question if you don’t mind. Why are the line buffers dimensioned in that specific way. I understood that you said that the reason for that dimensioning is to allow to compute an output to be able to use it in the next layer, but I don’t understand how you can keep the layers of the image if you’re going to need it again in the following filters?
Hello Sergiu Duda
I try to run your get_params.py and I un-commet the part of weight saving. but when I launch the py file I got a error
here is the error message
Traceback (most recent call last):

  File "get_params_file.py", line 292, in

    _, _, parameters = model(X_train, y_train, X_test, y_test, num_epochs = 10, minibatch_size = 128)

  File "get_params_file.py", line 245, in model

    save_W1(parameters["W1"].eval())

  File "get_params_file.py", line 39, in save_W1

    aux = np.reshape(aux,(4,4))

  File "", line 6, in reshape

  File "/home/liu/.local/lib/python3.6/site-packages/numpy/core/fromnumeric.py", line 299, in reshape

    return _wrapfunc(a, 'reshape', newshape, order=order)

  File "/home/liu/.local/lib/python3.6/site-packages/numpy/core/fromnumeric.py", line 58, in _wrapfunc

    return bound(*args, **kwds)

ValueError: cannot reshape array of size 49 into shape (4,4)
How to deal with this error?
I use python3.6.9 and ubuntu18.04
Thank you!
Hello,
I followed the steps in Readme.md to run this project, after running the tcl script to generate the project, I get a loading screen which says running sources, however it has been running sources for the past day. What could be the problem?