A version of this article, titled SystemVerilog Assertions Verification with SVAUnit, was presented at CDNLive EMEA 2015 by Andra Socianu and Ionut Ciocirlan.
Intro
SystemVerilog Assertions(SVA) play a central role in functional verification of protocols, encompassing feature checking and coverage.
In order to benefit from assertion advantages (fast, synthesizeable, non-intrusive, coverable), we must verify they pass or fail as described by the protocol specification. In turn this requires to implement, for each assertion, the sequences of stimuli that properly trigger the assertion (making it pass or fail) as well as checks to ensure its correct behaviour under the given conditions. In order to protect reusability and maintainability of an SVA package one should not contaminate the SVA definitions with stimuli generation or checking logic. The debug effort should be kept to a minimum so a directed testing approach is preferable.
For standard protocols, like AMBA APB, one can use a VIP or implement a testing infrastructure from scratch. Both ways have their pros and cons. A VIP allows you to reuse some of the generation and checking capabilities, but can add overhead due to the extra logic required for driving and monitoring of error scenarios (e.g. new sequences, driver/monitor/checker tweaks). If you implement a custom testing infrastructure from scratch you have the advantage of easy control of stimuli, but there you might miss reusability and flexibility.
That is why we developed the SVAUnit framework with three objectives in mind:
- decouple SVA test logic from SVA definition
- simplify the creation of stimuli/checkers that validate the SVA
- simplify test and stimuli maintenance
SVAUnit is an UVM compliant package that combines the unit testing paradigm of the software world with the powerful feature of assertions from SystemVerilog. The SVAUnit framework is simulator independent.
Basic Concepts
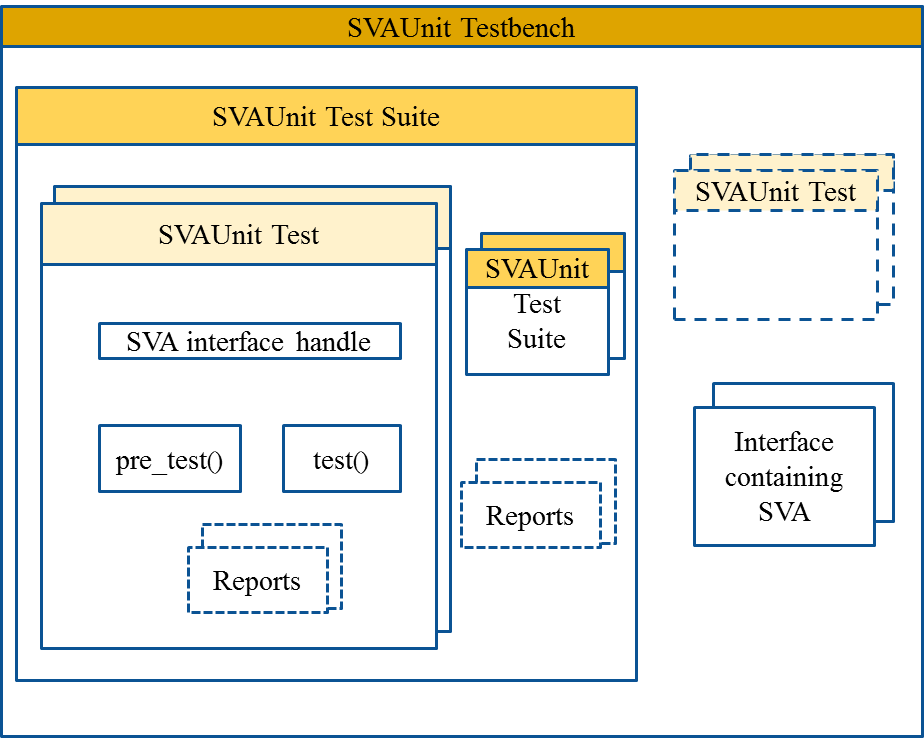
The SVAUnit Testbench is a module that instantiates one or more interfaces that contain SVA to be tested. It also instantiates the SVAUnit framework.
The SVAUnit Test inherits uvm_test and contains the stimuli generation and checking logic.
The SVAUnit Test Suite inherits svaunit_test and is used to aggregate more unit tests and/or test suites.
The concepts are represented in big details in the diagram below.
SVAUnit testing is based on a flow (see the image below) that is easy to follow and implement.
You should start by downloading the SVAUnit package.
Step 1. Create an interface that contains the SVA under test
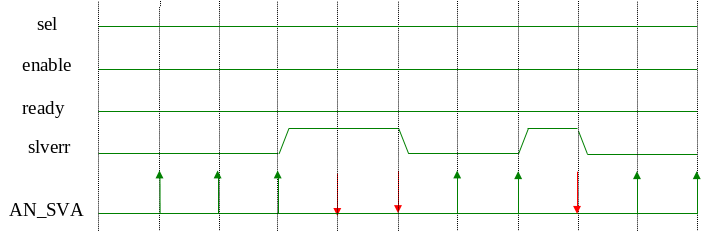
Let’s start with a simple example, an interface with four signals: sel, enable, ready and slverr. The signals must comply with the following requirement: slverr signal should be 0 if no slave is selected or when transfer is not enabled or when slave is not ready to respond.
The requirement, translated as a property inside the interface, will look like the following.
interface an_interface (input clk);
   ...
   property an_sva_property;
      @(posedge clk)
      !sel or !enable or !ready |-> !slverr;
   endproperty

   AN_SVA: assert property (an_sva_property) else
     `uvm_error("AN_SVA", "slverr must be LOW when one of sel, enable or ready is LOW!")
endinterface
We test the assertion associated with this property by implementing the test scenario presented in the figure below. The green arrow indicates a PASS status of the assertion, while red arrow indicates a FAIL status of the assertion.
Step 2. Create an SVAUnit Testbench
The SVAUnit framework is enabled by instantiating the `SVAUNIT_UTILS macro in the testbench module, named top in this case.
We must instantiate the interface containing the SVA definitions in the testbench and set the interface reference in the uvm_config_db in order to have access to it from the test environment.
The test is started using the run_test() method call, which is UVM’s standard procedure.
 module top;
   // instantiate the SVAUnit framework
   `SVAUNIT_UTILS
   // instantiate the interface containing the SVA we need to test
   an_interface dut_if(.clk(clock));

   initial begin
     // register the interface with the uvm_config_db
     uvm_config_db#(virtual an_if)::set(uvm_root::get(), "*", "VIF", dut_if);
     // start the test
     run_test();
   end
   .....
endmodule
Step 3. Create an SVAUnit Test
The SVAUnit test class inherits uvm_test and will contain the testing scenario for the SVA implemented in Step 1. In case we have multiple scenarios, we can implement each inside a separate test.
The test class contains two tasks, pre_test() and test(), which are extension points that the user will implement.
class unit_test_1 extends svaunit_test;
   virtual an_interface vif;
   .....
   function void build_phase(input uvm_phase phase);
      if (!uvm_config_db#(virtual an_interface)::get(uvm_root::get(), "*", "VIF", vif))
         `uvm_fatal("SVAUNIT_NO_VIF_ERR", "SVA interface is not set!");
   endfunction

   task pre_test();
      // initialize signals
   endtask

   task test();
      // create scenarios for AN_SVA
   endtask
   .....
endclass
Step 4. Implement the pre_test() task
We recommend initializing the interface signals inside this task. This should be done in order to avoid signal value propagation when running multiple tests, that could lead to undesired scenarios. If pre_test() does not initialize the interface signals, then, the signals will retain the values from the previous test. This is because tests run sequentially within the same simulation run.
task pre_test();
   // initialize signals
   vif.enable = 1'b0;
   vif.ready  = 1'b0;
   vif.sel    = 1'b0;
   vif.slverr = 1'b0;
endtask
Step 5. Implement the test() task
The test() method contains the actual testing scenario for the SVA. Stimuli are driven on the interface signals and the check API provided by the SVAUnit will verify that the assertion behaviour matches the expected one.
task test();
   // scenario for AN_SVA
   @(posedge  vif.clk);
   @(posedge  vif.clk);
   for(int i = 0; i < 2; i++) begin
       @(posedge  vif.clk);
       fail_if_sva_not_succeeded("AN_SVA", "The assertion should have succeeded");
   end

   vif.slverr = 1'b1;
   @(posedge  vif.clk);

   for(int i = 0; i <= 1; i++) begin
       @(posedge  vif.clk);
       fail_if_sva_succeeded("AN_SVA", "The assertion should have failed");
   end
   .....
endtask
In our example scenario, we have used two checks that are part of SVAUnit API: fail_if_sva_not_succeeded() and fail_if_sva_succeeded(). The first one verifies that the SVA has succeeded at the time the check is done and the second one verifies that the assertion has failed given the driven stimuli.
Step 6. Create an SVAUnit Test Suite
SVAUnit provides the ability to group tests inside a test suite. The test suite class is a run container where unit tests are created and started. You can create a test by using UVM factory’s create() method. In order for a test to be started by a test suite, you need to register it with the test suite using the add_test() method. The tests will run in the same order as they were registered with the test suite.
class unit_test_suite extends svaunit_test_suite;
    // unit test instance.
    unit_test_1 unit_test1;
    .....
    unit_test_10 unit_test10;

    function void build_phase(input uvm_phase phase);
        // create the unit test instance
        unit_test1 = unit_test_1::type_id::create("unit_test1", this);
        // you can create more tests similar to unit_test1
        .....
        add_test(unit_test1);
        .....
        // you can register more tests similar to registering of unit_test1
    endfunction
endclass
Step 7. Run the simulation and read the reports
Several automatic reports are printed after the simulation ends. These reports contain information on:
- tests and/or test suites that have been run
- which assertions have been tested or not
- which checks have been exercised

Q&A
Where can I get the SVAUnit?
You can download the SVAUnit package from AMIQ’s github project repository.
Is SVAUnit Open Source?
Yes! It is released under Apache License 2.0.
What are the next steps?
We encourage you to send us your feedback as we intend to maintain the SVAUnit library in sync with real life requirements.
12 Responses
Hi Team,
I would like to see SVA example in EDA playground ,so that it will be golden reference for any tests.
This is really helpful.
Regards,
Syed Taahir
Hi,
Thank you for the suggestion.
We are exploring the possibility of uploading SVAUnit on EDAplayground.
I will get back to you as soon as it is available.
Thanks,
Ionut
I am able to compile the apb example but not sure what to check,please help?
Hi,
Thank you for the interest in SVAUnit.
Each APB test example, defined in examples/ex_apb/tests, represents a scenario in which one SVA defined in the amiq_apb_if interface.
The built-in demo run script can be used to run either one test or the entire test suite (defined in examples/ex_apb/tests/amiq_svaunit_ex_apb_test_suite.sv).
For all the test examples provided, you don’t have to check anything.
You can however examine the reports printed when the test is finished.
These reports contains information about:
You can also play with the SVA or test stimuli to see how it affects the reports.
If you have other questions, please do not hesitate to contact us.
Regards,
Andra
HI,
Actually i am facing weird issue while simulation.
Run directory::g13-1-san-06::/ sim
Run command::/run_svaunit.sh -tool questa -uvm uvm1.1 -f examples/ex_apb/apb_files.f -top apb_top -test amiq_svaunit_ex_apb_test_after_reset_sel -c yes
Everything is copied properly but getting UVM_FATAL::
# UVM_WARNING @ 0: reporter [BDTYP] Cannot create a component of type ‘amiq_svaunit_ex_apb_test_after_reset_sel’ because it is not registered with the factory.
# UVM_FATAL @ 0: reporter [INVTST] Requested test from command line +UVM_TESTNAME=amiq_svaunit_ex_apb_test_after_reset_sel not found.
#
# — UVM Report Summary —
#
# ** Report counts by severity
# UVM_INFO : 3
# UVM_WARNING : 1
# UVM_ERROR : 0
# UVM_FATAL : 1
# ** Report counts by id
# [BDTYP] 1
# [INVTST] 1
# [Questa UVM] 2
# [SVAUNIT] 1
please help me if i am missing anything.
Regards,
Taahir
Hi Team,
Please help me on above issue.
I m ready to come on Skype if we have can sync up.
Regards
Taahir
Hi Taahir,
The test you are trying to run is included in the amiq_svaunit_ex_apb_test_after_reset_test_suite test suite.
To run this test suite please use:
run_svaunit.sh -tool questa -uvm uvm1.1 -f examples/ex_apb/apb_files.f -top apb_top -test amiq_svaunit_ex_apb_test_after_reset_test_suite -c yes
You can change the contents of the test suite, defined in amiq_svaunit_ex_apb_test_after_reset_test_suite.sv, by editing the `add_test macro calls from the build phase.
You encountered the error because the test you tried to run is parameterized: amiq_svaunit_ex_apb_test_after_reset_sel#(int unsigned MAXIM_LOW_TIME = 10).
You cannot refer to a parameterized class via a string type name directly (i.e. start it directly from the command line) , as explained here.
There are some workarounds but the simplest way is to run the test included in a test suite.
Regards,
Ionut
Hello Ionut,
Thank you so much, I will try and get back to you.
Regards
Taahir
Hi,
What is the difference between “fail_if_sva_succeeded” and “fail_if_sva_finished”. I am not clear between succeeded and finished.
Thanks,
Jay
Hi,
If the SVA under test has finished and passed (the expression was true) at the time of the ‘fail_if_sva_succeeded’ check, the simulation will be stopped with a corresponding error message.
The ‘fail_if_sva_finished’ check will trigger the simulation to stop (with a corresponding error message) if the SVA under test has finished, regardless if it passed or failed.
Hope this makes it clear for you.
Best regards,
Ionut
Yes It is clear now.
Thanks for the quick reply,
Jay